Excite Truck - A guide to star maximization
Table of content
- Introduction
- Bronze - Mexico - Greenhorn Gulch
- Bronze - Fiji - Atoll Hop
- Bronze - Canada - Puddle Jump
- Bronze - Scotland - Sylvan Glen
- Silver - Mexico - Dusty Pass
- Silver - Finland - Iceberg Run
- Silver - Scotland - Highland Moors
- Silver - Fiji - Beach Run
- Silver - China - Water Way
- Gold - Canada - River Run
- Gold - Finland - Tanker Hop
- Gold - China - Northern Ridge
- Gold - Scotland - Castle Keep
- Gold - Fiji - Mountain Run
- Platinum - Finland - Ski Jump Loop
- Platinum - Scotland - Baron's Run
- Platinum - Mexico - Devil's Ladder
- Platinum - China - Southern Loop
- Platinum - Canada - Winding-Road
- Diamond - Nebula - Crystal Road
Introduction
Excite truck is a fairly fun game on the Wii, though as a car race game, the objective is actually to score points throughout the circuit by flying, drifting, etc.
This guide is here to help you maximize stars. You should use it once you're experienced with the game and want to increase your scores. Although I'm calling it a star maximization guide, I won't claim those are the best scores you can get. There is room for improvement and there are other techniques to abuse.
I mainly use the Dynamo and the Monster Truck but feel free to take the truck you want. My playstyle is quite oriented towards jumping and tree-runs so if your truck has a low air statistic, you will probably need to find other paths.
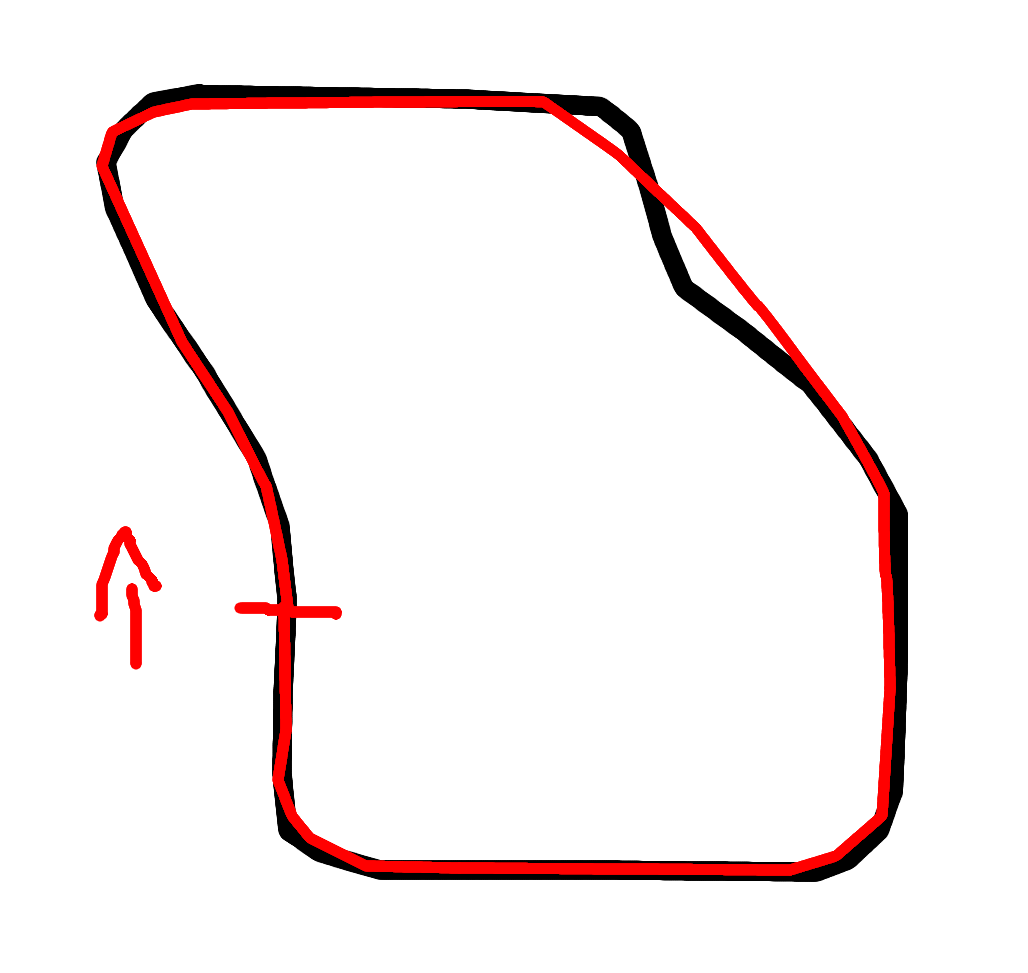
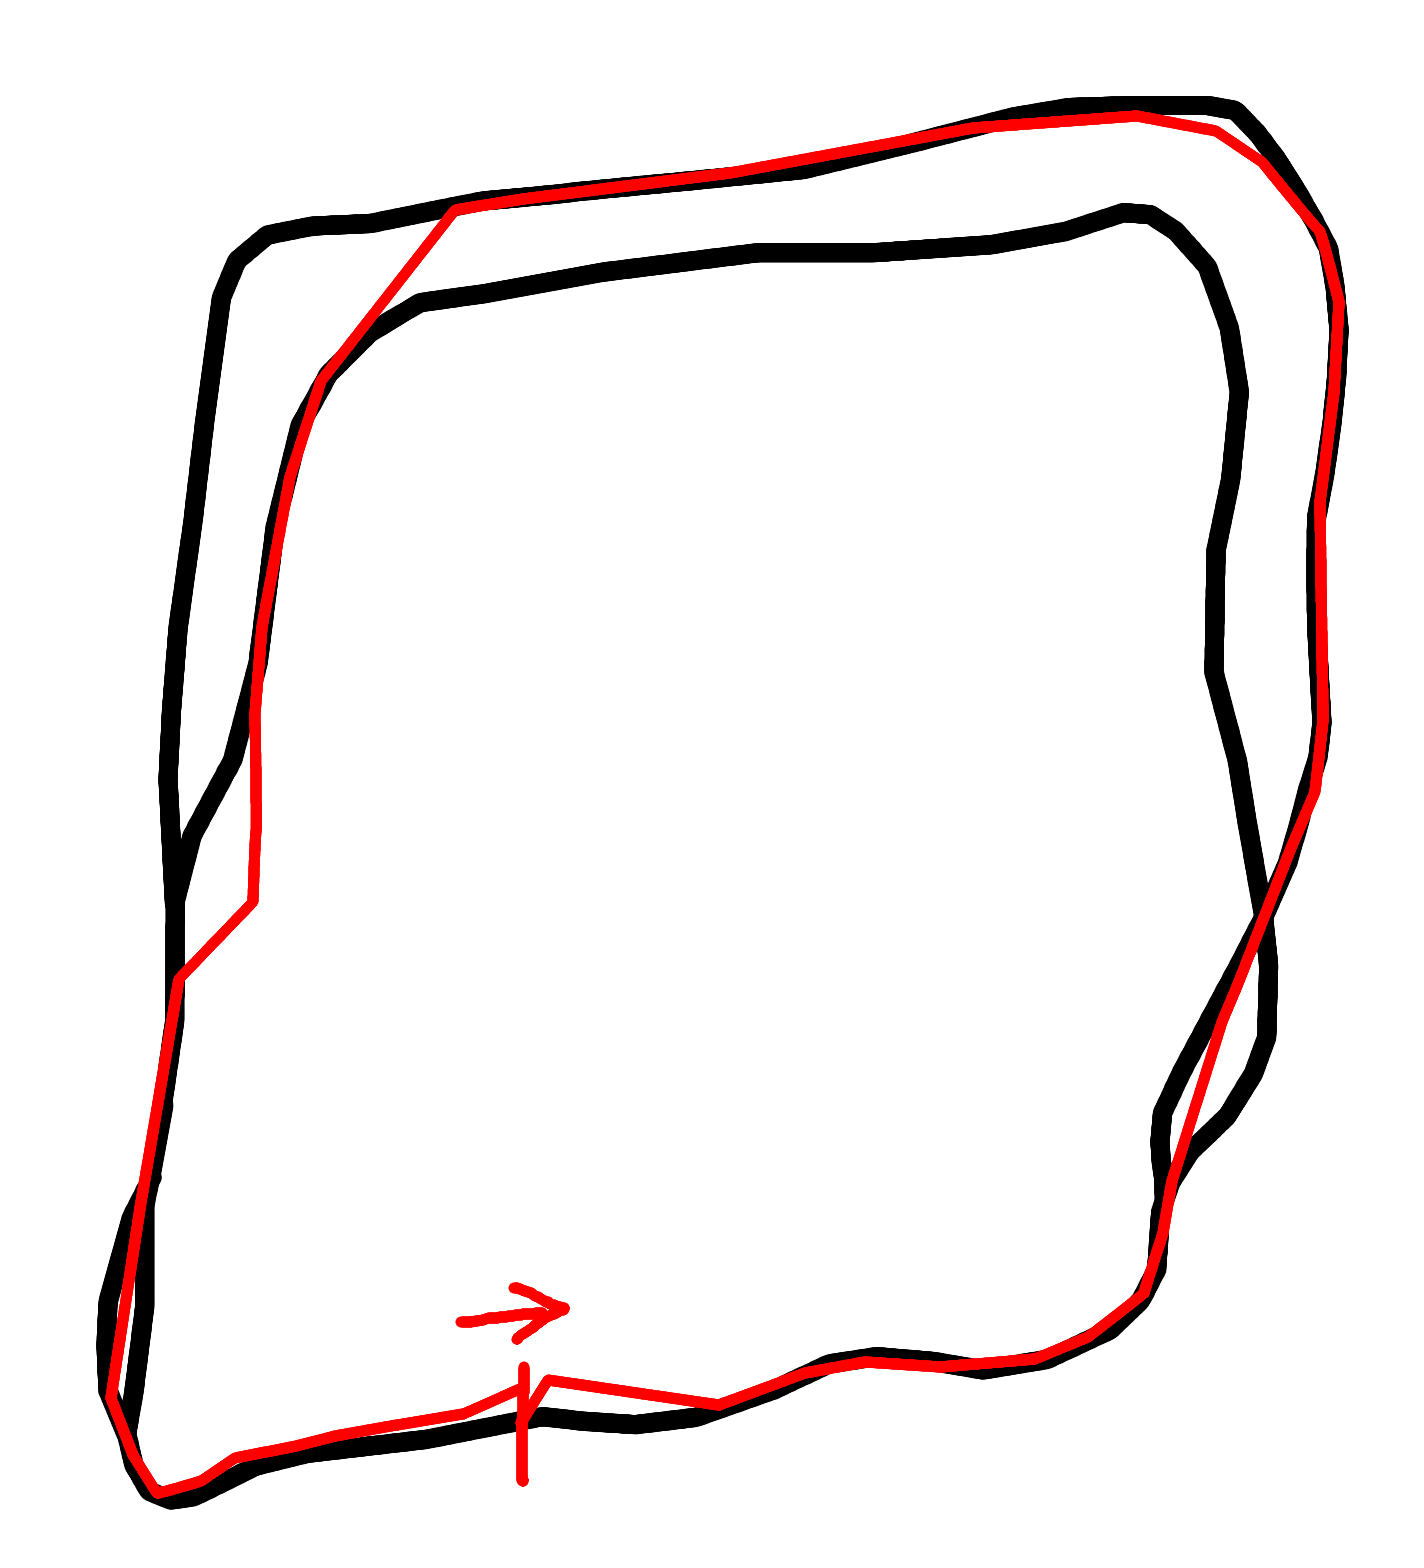
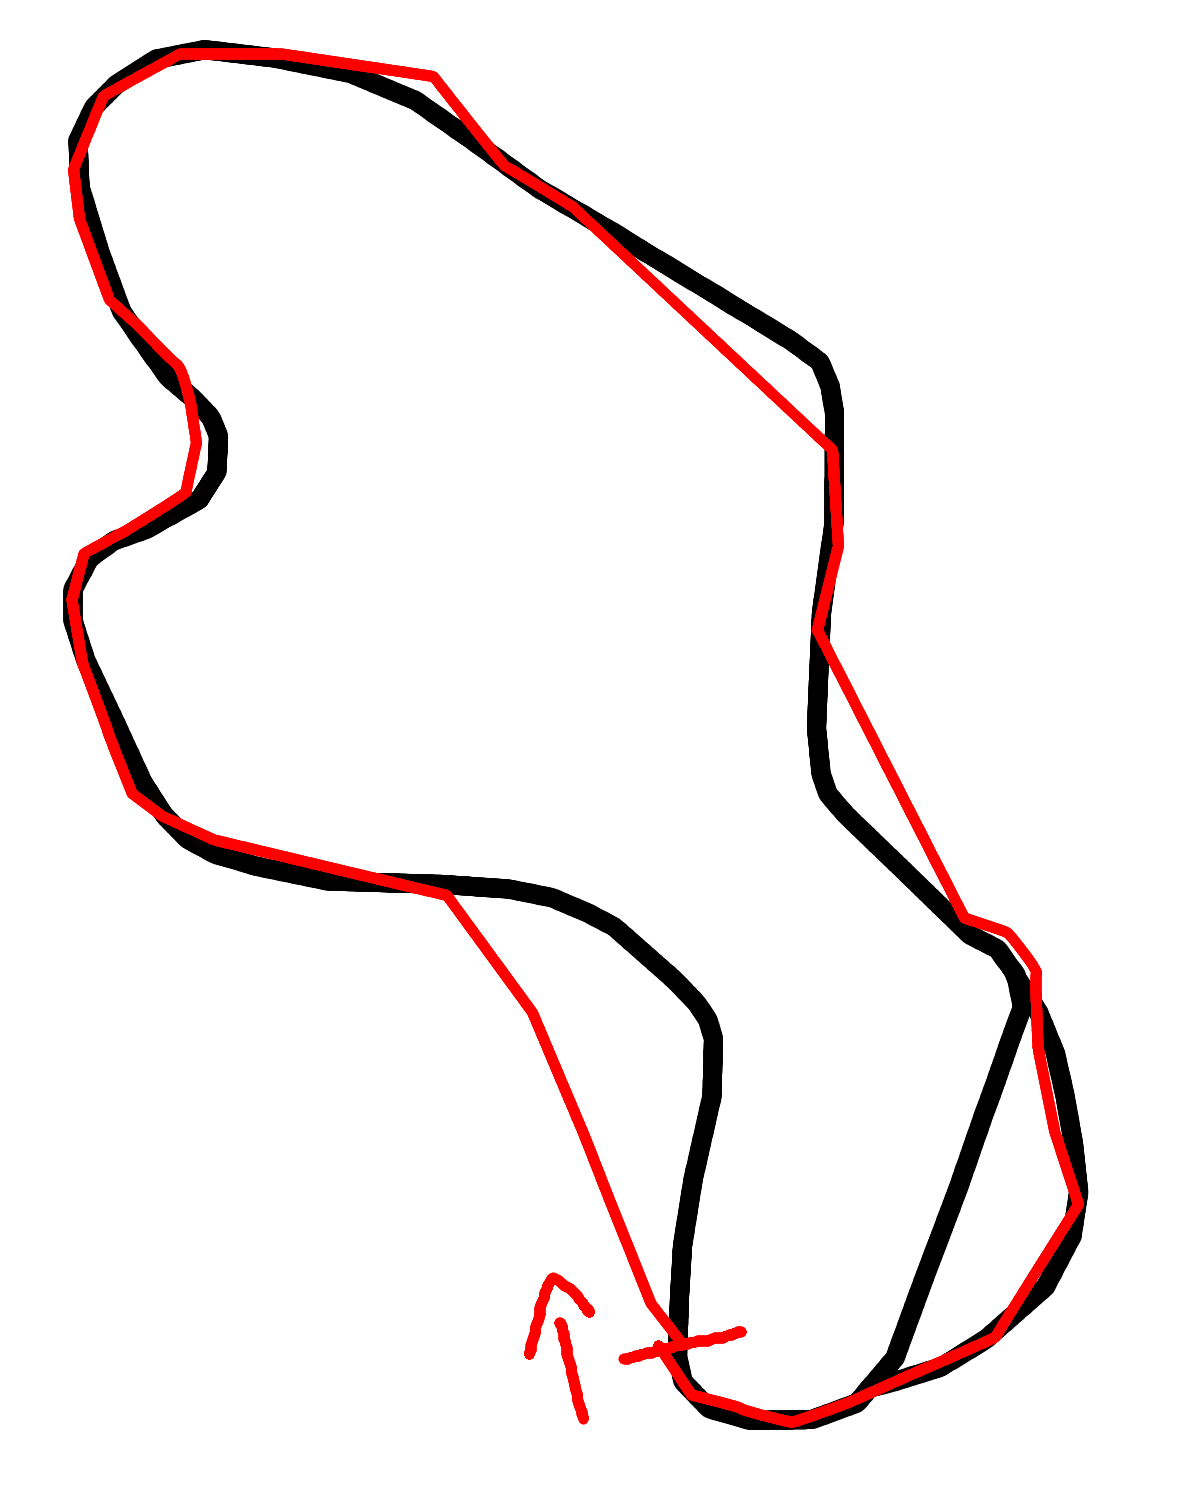
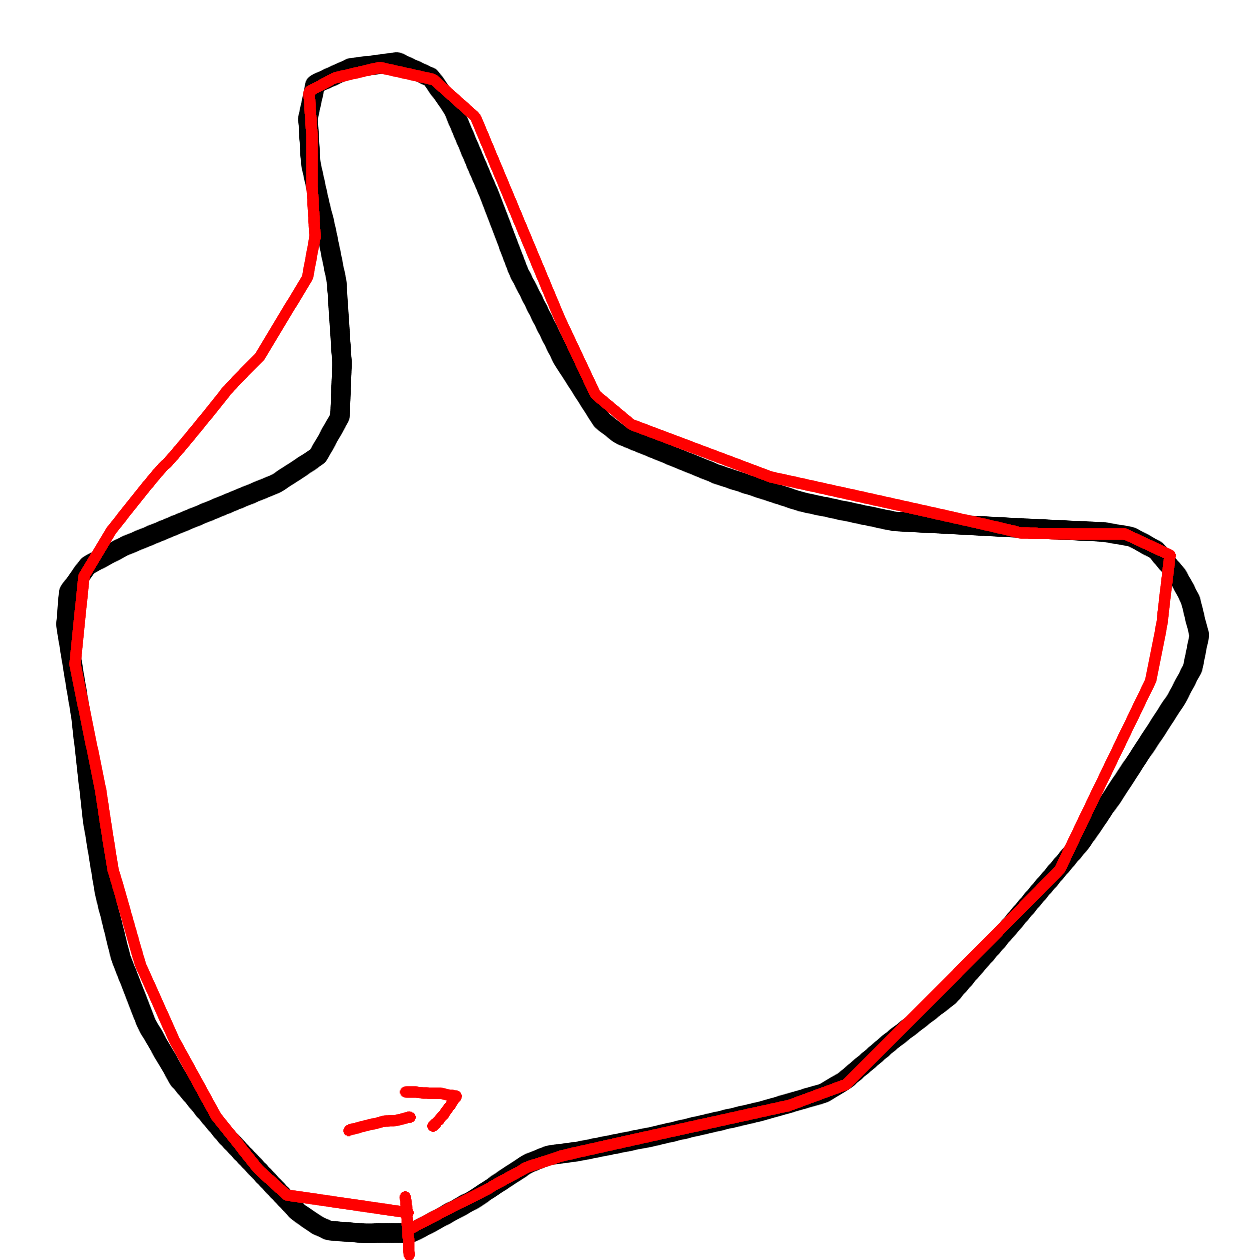
Bronze - Mexico - Greenhorn Gulch
My best: 168
Claimed online: 175
Truck used: Monster Truck
Rough details
- 22 Air
- 13 Drift
- 16 Tree-Runs
- 16 Spins
- 25 Jump Combos
- 18 Smashes
- 7 Rings
Lap
Start by smashing the car on your left, then follow the road. On the first jump aim for a two spins, upon landing the opponents should be drifting, try to smash one and then turn to the right. Take the morph and jump in the rings, then spin. Try to land on the right of the track, just before the bump. Jump on it, go for the pow and stay close to the trees on your left. At the end of the hill, fall in the forest and try not to smash a tree. There is an ideal landing point in the trees on the right on the trees leading to a small corridor turning to the right. When you get back on the tracks, check your opponents for a truck smash. Start a combo jump on the bumps, turn right, you may not take the morph, continue the combo jumps on the cliff. After a few jumps go back to the track. Try to drift on the last turn, this is also a nice spot for smashing an opponent.
Notes
You can also spin on the last jump instead of doing a combo jump, though it is slower.
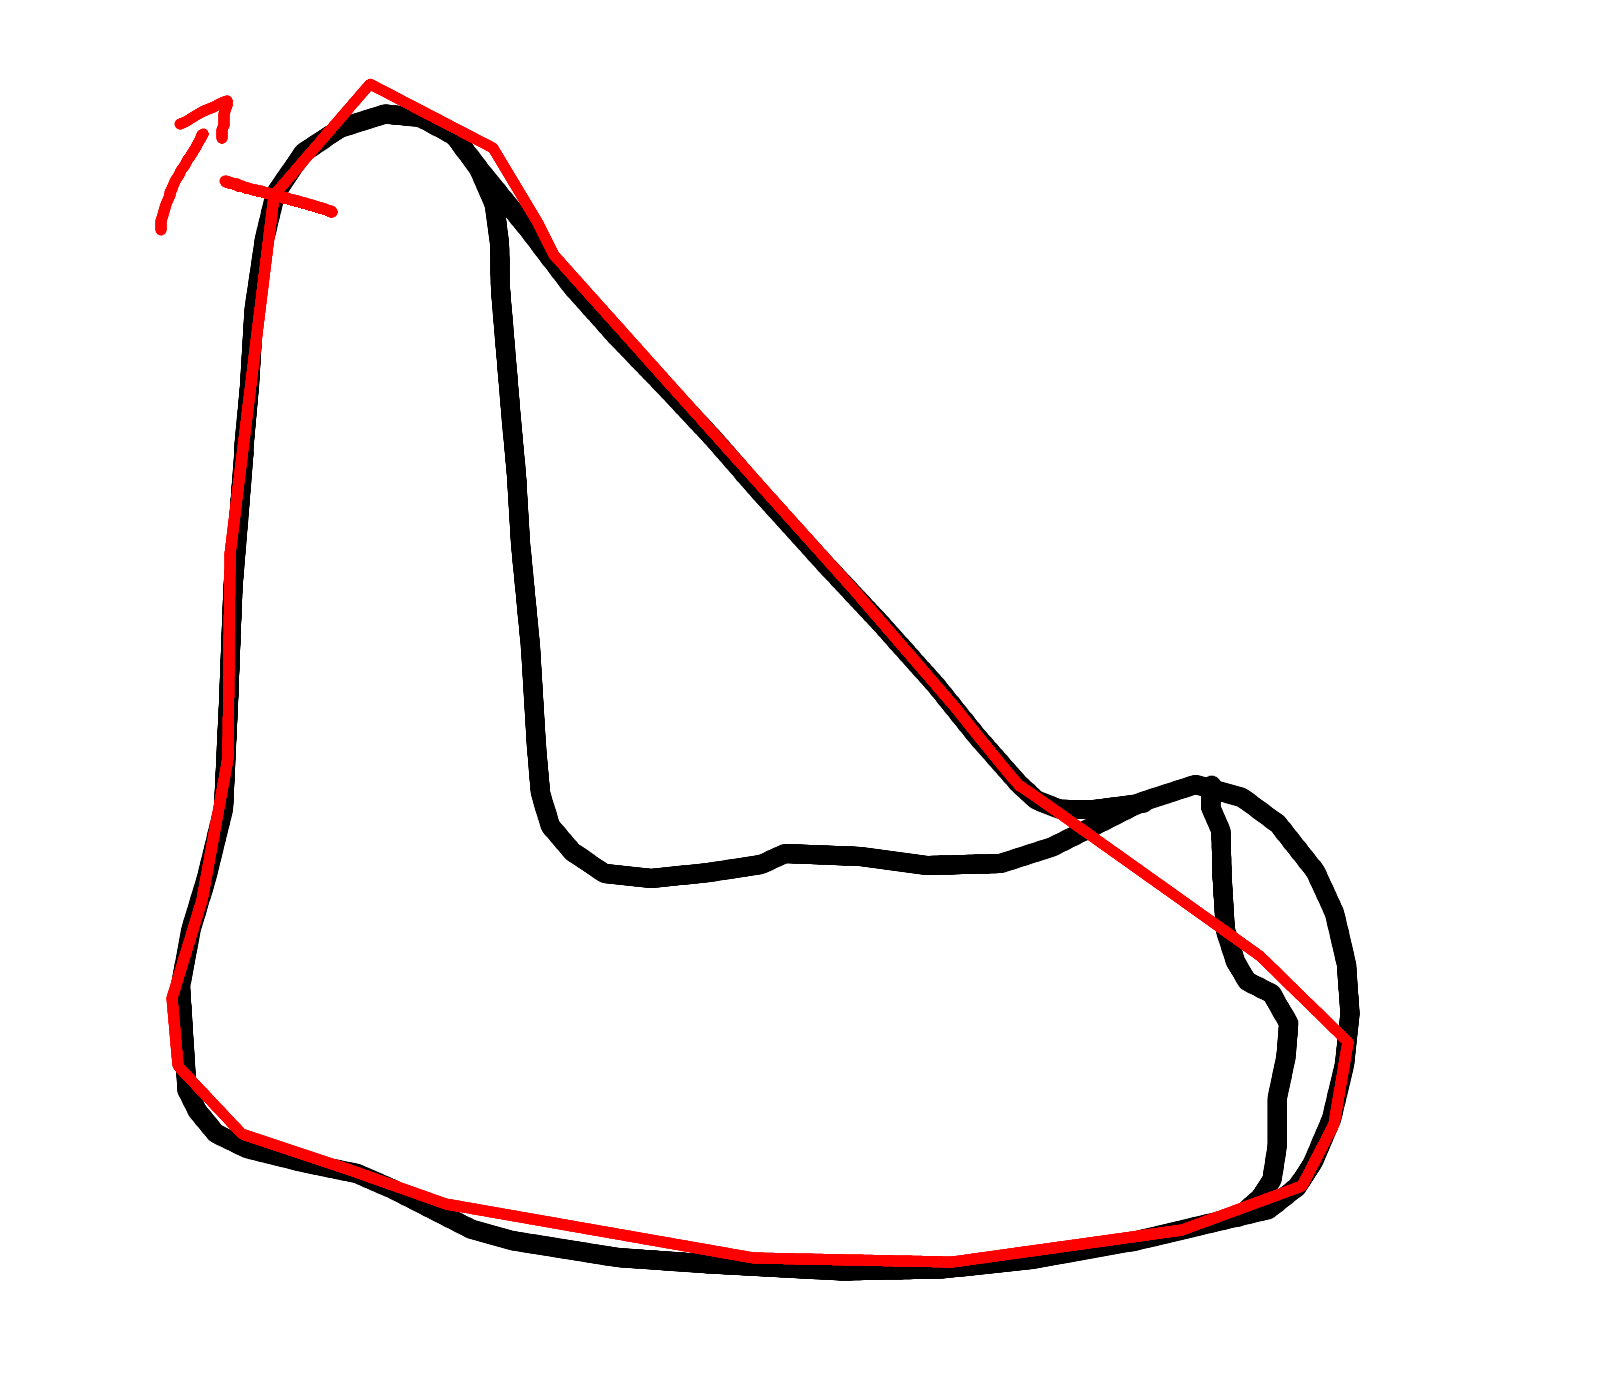
Bronze - Fiji - Atoll Hop
My best: 285
Truck used: Dynamo
Rough details
- 33 Air
- 29 Drift
- 87 Tree-Runs
- 30 Jump Combos
- 12 Smashes
- 20 Rings
Lap
Start with the usual left-truck smash, then continue to the left, jump on the bump and get close to the trees on the left. When the track splits, go in the middle between the palms and turn to the right. You will end up following the right track but behind the trees on its left. Keep doing this while getting back on the sand, turning left and going up. Jump at the end, but don’t do a turbo jump, just fly over the track to land in the trees on the left. Get back on the track to take the morph, jump and take the rings. Try to land when the track splits and go in the water following the left tracks to get close to the palms. Make sure to take the morph and jump in the rings. Get a little to the left, near the trees, jump again, aim for the trees on the right, turn right, jump, aim for the trees on the left, jump, stay close to the palms on the left and jump again on a bump to conclude the jump combo. You should end up drifting on the now reunited tracks. Take the morph and cut the turn between the trees on the left. Take the right turn, go straight for the next morph, then turn left and go inside the tree corridor. Jump at the end and go under the arch. Take the left track and jump over the trees on the right. Make sure to land on the left track and drift to the left. Don’t follow the whole turn, instead cut inside the forest on the left. Get back on the left track and lean to the left near the trees.
Notes
The tree-run in the jump combo is hard.
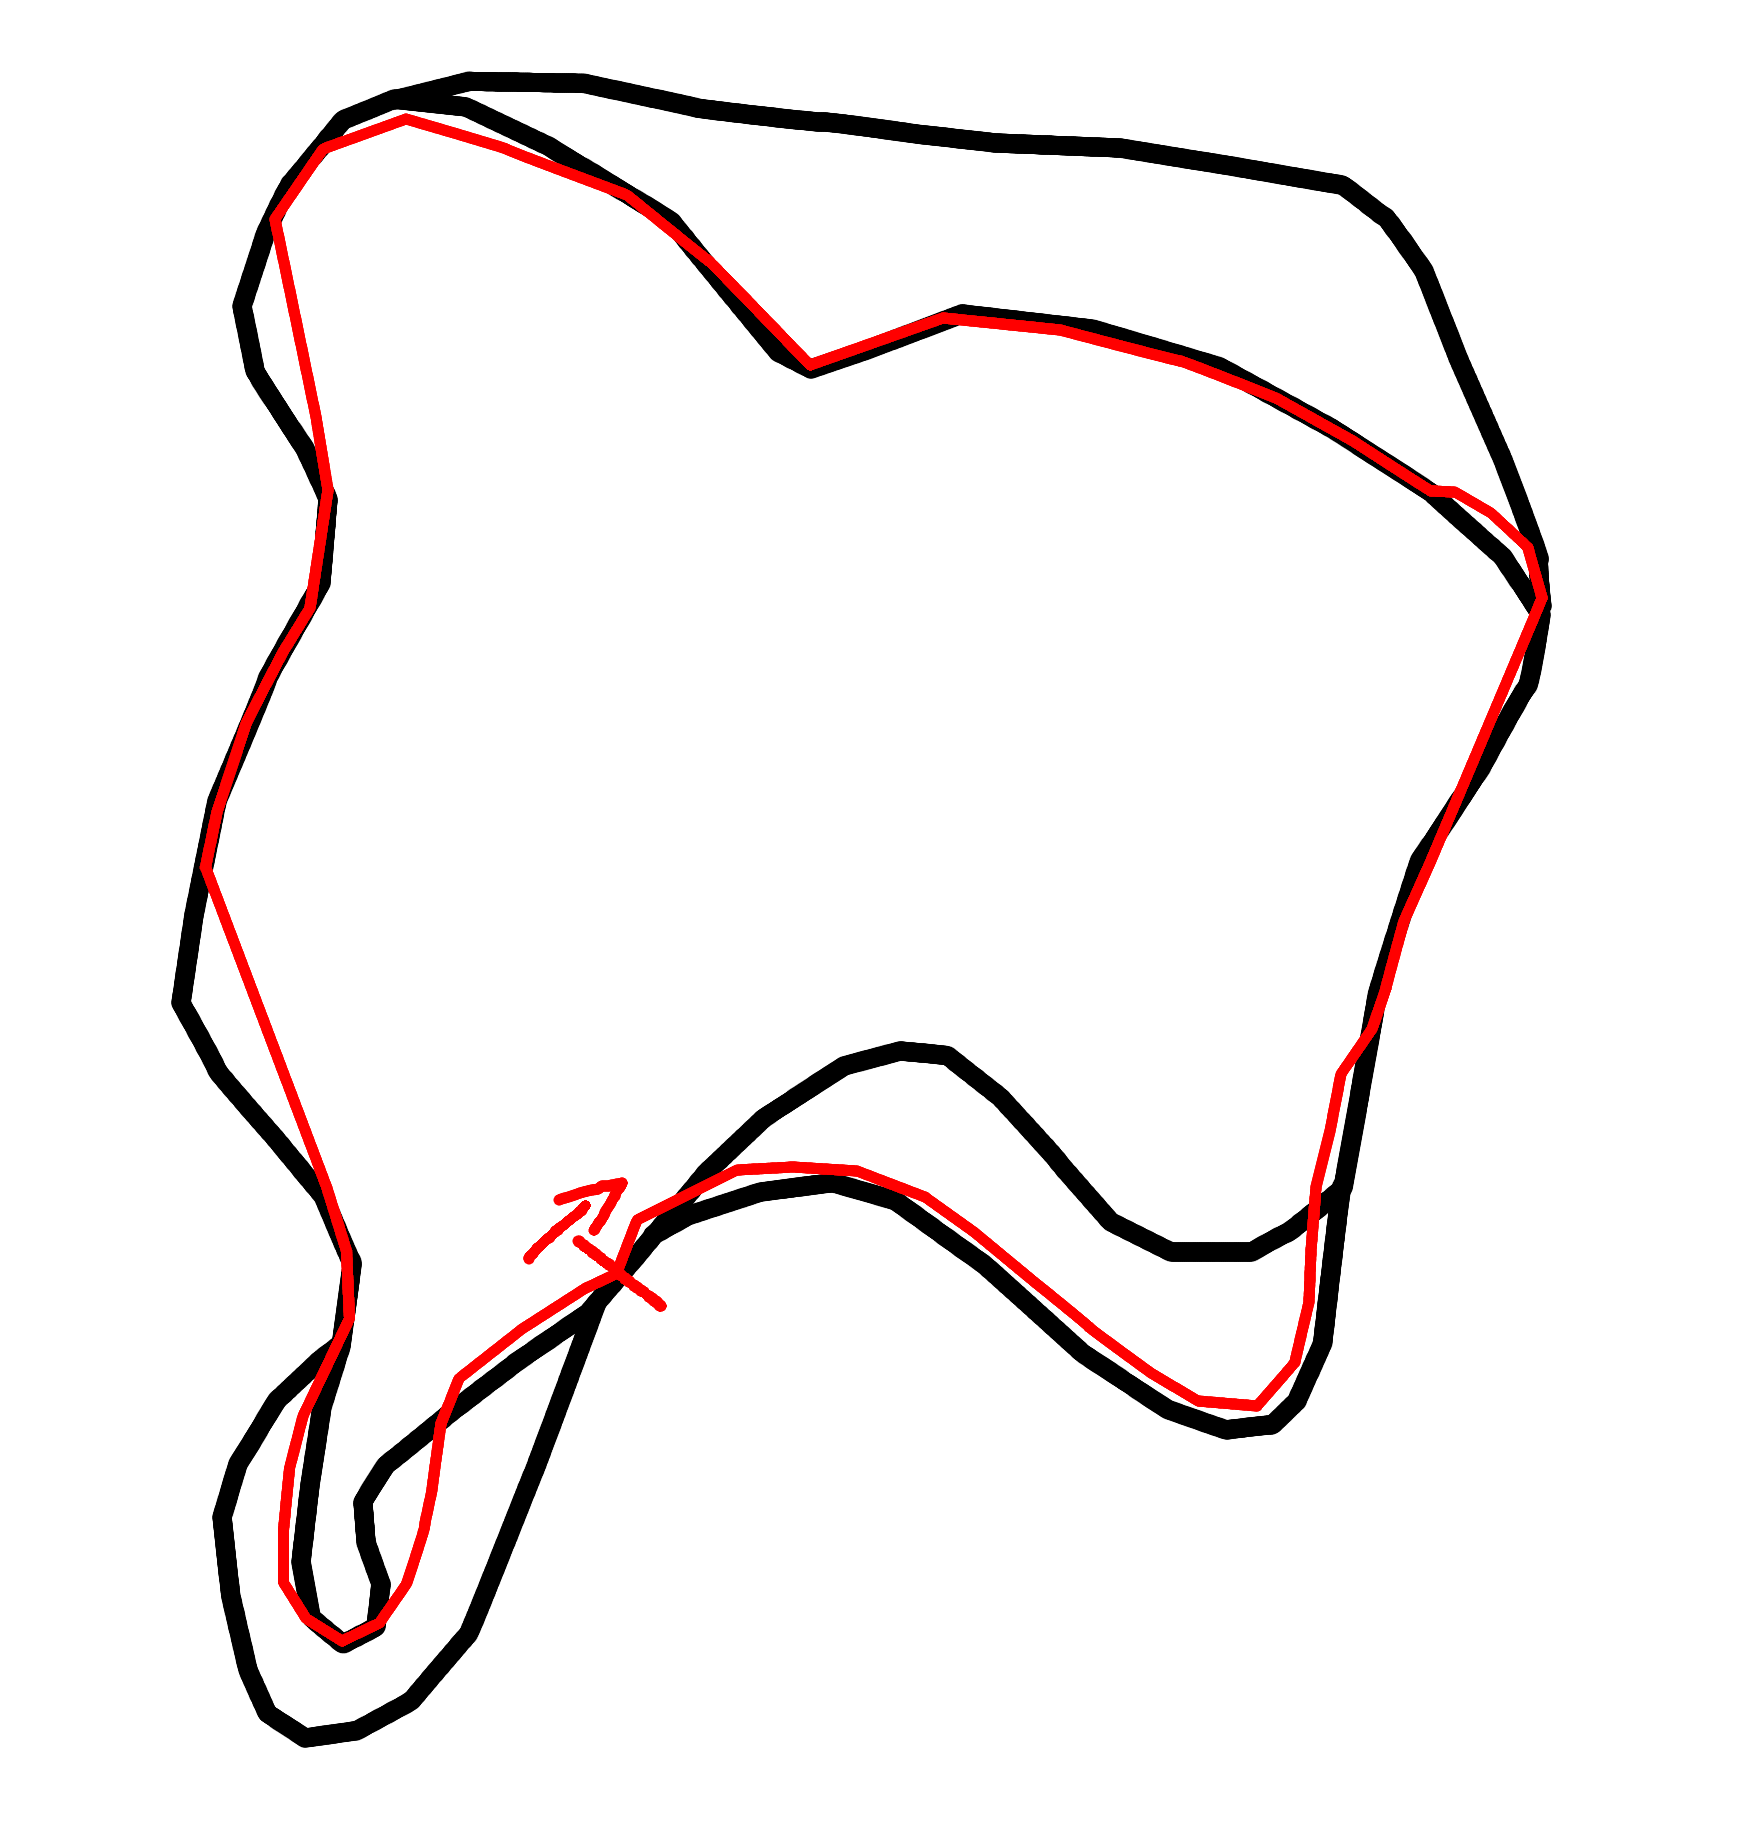
Bronze - Canada - Puddle Jump
My best: 319
Truck used: Dynamo
Rough details
- 32 Air
- 34 Drift
- 106 Tree-Runs
- 24 Smashes
- 20 Rings
Lap
Smash the truck on your left and cut the turn by going between the trees. You should encouter the other opponents drifting, smash another one, then drift on the left. Take the morph and jump in the rings. Turn to the left, follow the left track and go even further to the left to jump behind the trees. Stay at the left of the track but come back to take the morph and jump in the rings. You should not turn while flying, instead try to land beyond the track to get behind the tree line on its right. You will end up on falling along the right track, after landing get close to the trees on your left, take the morph and continue the tree-runs. At the end of the water, speed-up, take the morph and jump through a few rings. The last ones are a little to hard to get, avoid them and instead fly to the left to land between the trees just before the tracks reunite. Drift to the left while staying close to the trees on the right. Turn to the right, take the pow and get in the tree corridor. Cross the track and get behind the trees on its right while going up. Turn and get behind the trees on the left while going down. Come back to the track before the right turn and stay close to the trees on the right while drifting.
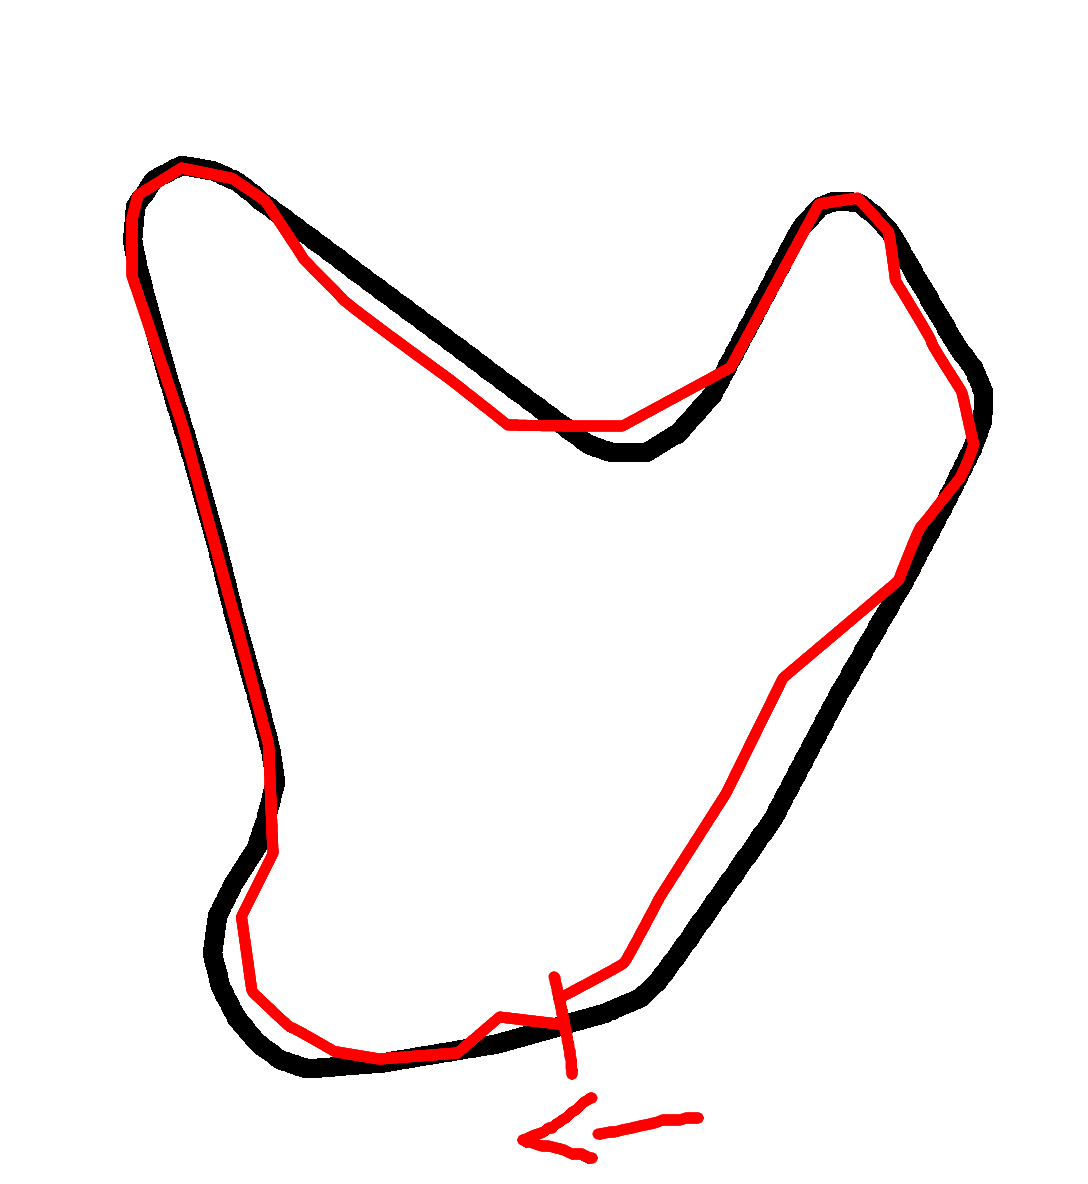
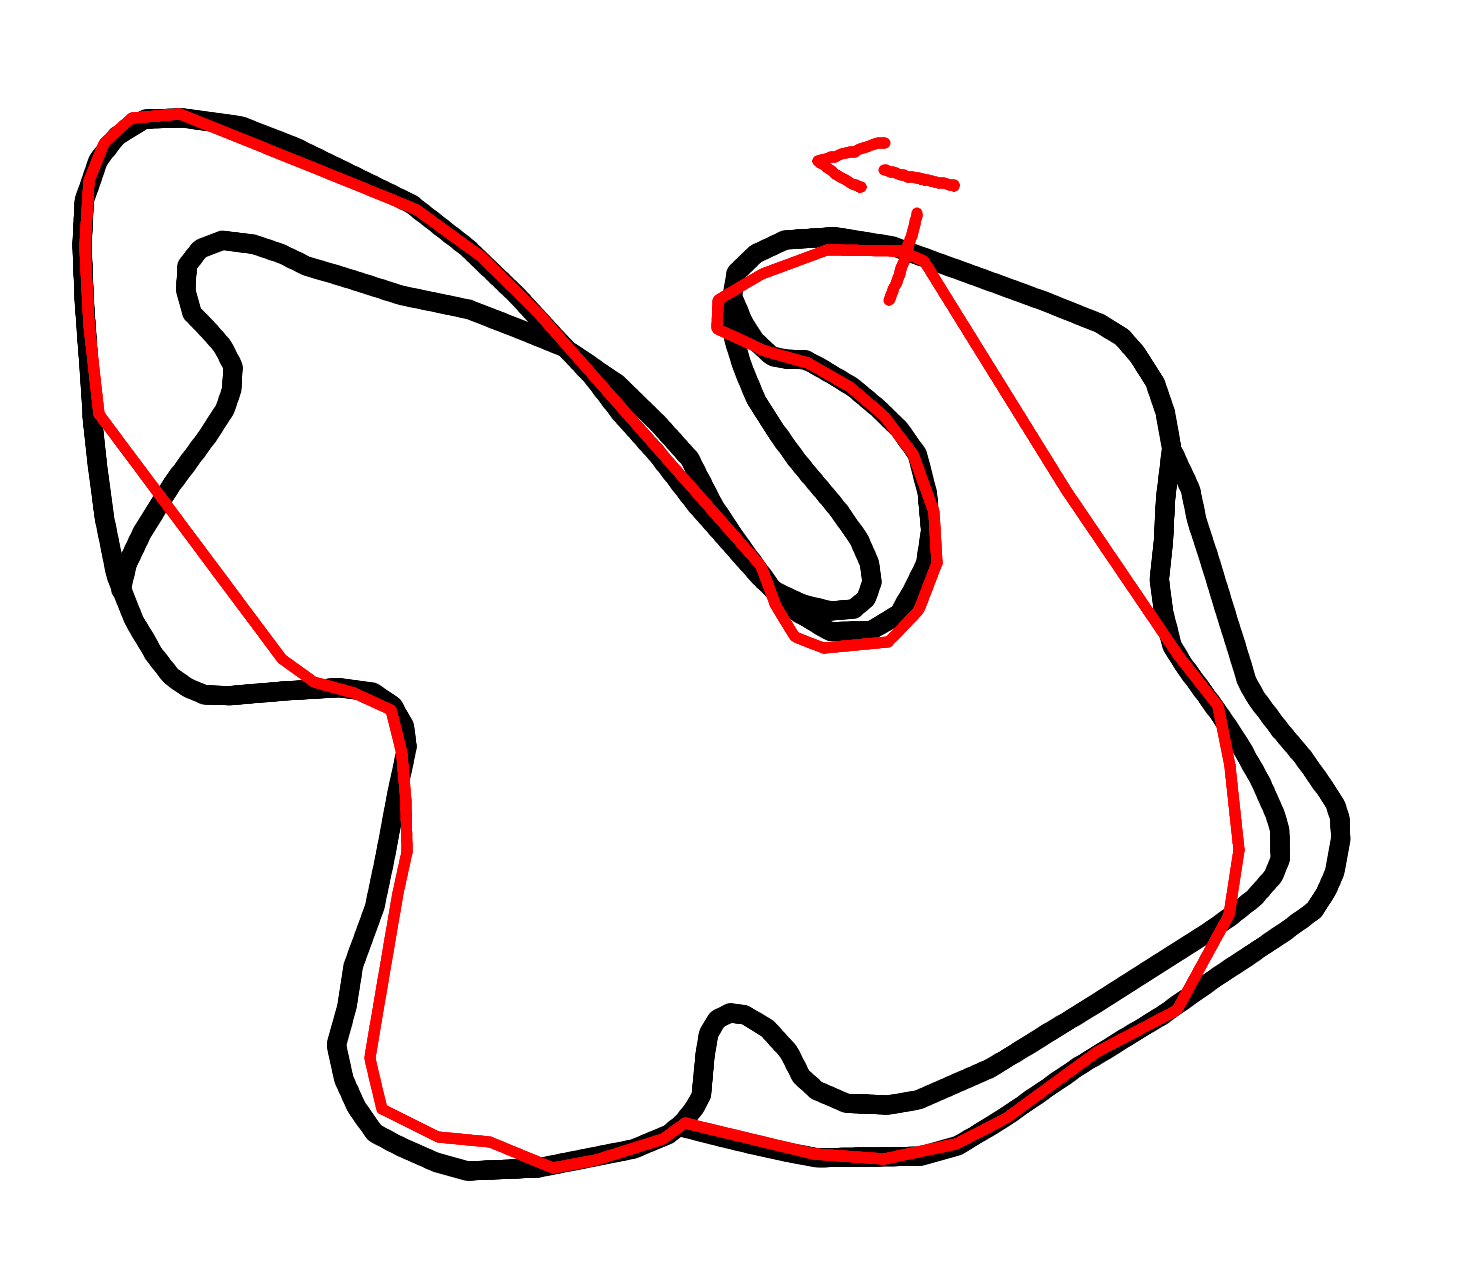
Bronze - Scotland - Sylvan Glen

My best: 273
Truck used: Dynamo
Rough details
- 38 Air
- 10 Drift
- 110 Tree-Runs
- 36 Jump Combos
- 17 Smashes
Lap
Start with the usual smash, then take the pow and go between the trees on the right of the track. It can be a little hard to navigate without crashing because of the bumps. Try to stay in the forest until the right turn. Drift to the right and get back in the forest, this time there is no bump, it should be easy. When you get to the slope, lean to the left to get back to the track as you fly. Lean on the right of the track as you start a jump combo on the bumps. Before the right turn you can go between the wall and the trees and jump on a rock. Follow the track until the morph, take it, jump in the rings and spin.
Notes
Instead of taking the last morph you can go between the trees on the right though it is quite harder and may lose you some time if you crash.
Silver - Mexico - Dusty Pass
My best: 202
Claimed online: 216
Truck used: Monster Truck / Dynamo
Rough details
- 32 Air
- 13 Drift
- 37 Tree-Runs
- 12 Spins
- 29 Jump Combos
- 25 Smashes
Lap
Destroy the car on your left then jump and go to the right. Aim for the small hole just before the cliff and start a combo jump. Land before the two trees on the right. There is a small bump so you can jump on it and then jump again on the hill. Fly to the right and land in the ravine, if you land right you can do one last jump before entering the canyon. Drift to the left, this is a good spot to smash another truck. Then go straight to the morph, jump but quickly fall down and spin. Lean on the left to take the morph to open the tunnel, lean further to the left to get close to the trees then take the pow. The tree-run is a little hard, stay a little on the left then lean slowly on the right, there is a path that will bring you back to the track while staying in the trees. Fly over the water, spin and land just before a bump on the left. Jump on it and aim for the long bump with a tree on it, jump again. Don't take the morph on the left, go for the one on the right and jump in the rings, then spin. Turn left and jump on the few bumps before the finish line.
Notes
If you hit a tree with the pow, go back on the track and try to smash an opponent. The jump with the rings lose some time, you may want to take the morph on the left to go faster to the finish line, though you will lose some stars. I find this race quite hard and the 216 stars score shows there is some room for improvement. I have no idea how it’s done though. Feel free to explore other ways.
Silver - Finland - Iceberg Run
My best: 205
Claimed online: 217
Truck used: Dynamo
Rough details
- 35 Air
- 14 Drift
- 30 Tree-Runs
- 31 Jump Combos
- 12 Smashes
- 10 Rings
Lap
Smash the opponent on your left, then continue behind the tall tree and jump. Fly near the trees and land on the left of the track. Take the morph and go to the left. Lean on the right and jump above the trees, then spin. You will land before the small jump where the tracks splits, follow either tracks. On the bump before the water, jump on the right. Take the morph for the rings and pass through them. After landing, jump again on the left but still go under the arch, this is to preserve easily the combo. Continue straightforward and finish the jump combo. Take the morph at the end and jump over the trees to land on the left track. Take the pow and lean on the right of the track, next to the trees. Don’t turn following the track at the end, continue straightforward between the trees. Turn to the right when you get by the chairlift pole. Combo jump on the bump, land before the trees in the middle and jump again through them. Drift to the left and get close to the trees on your left.
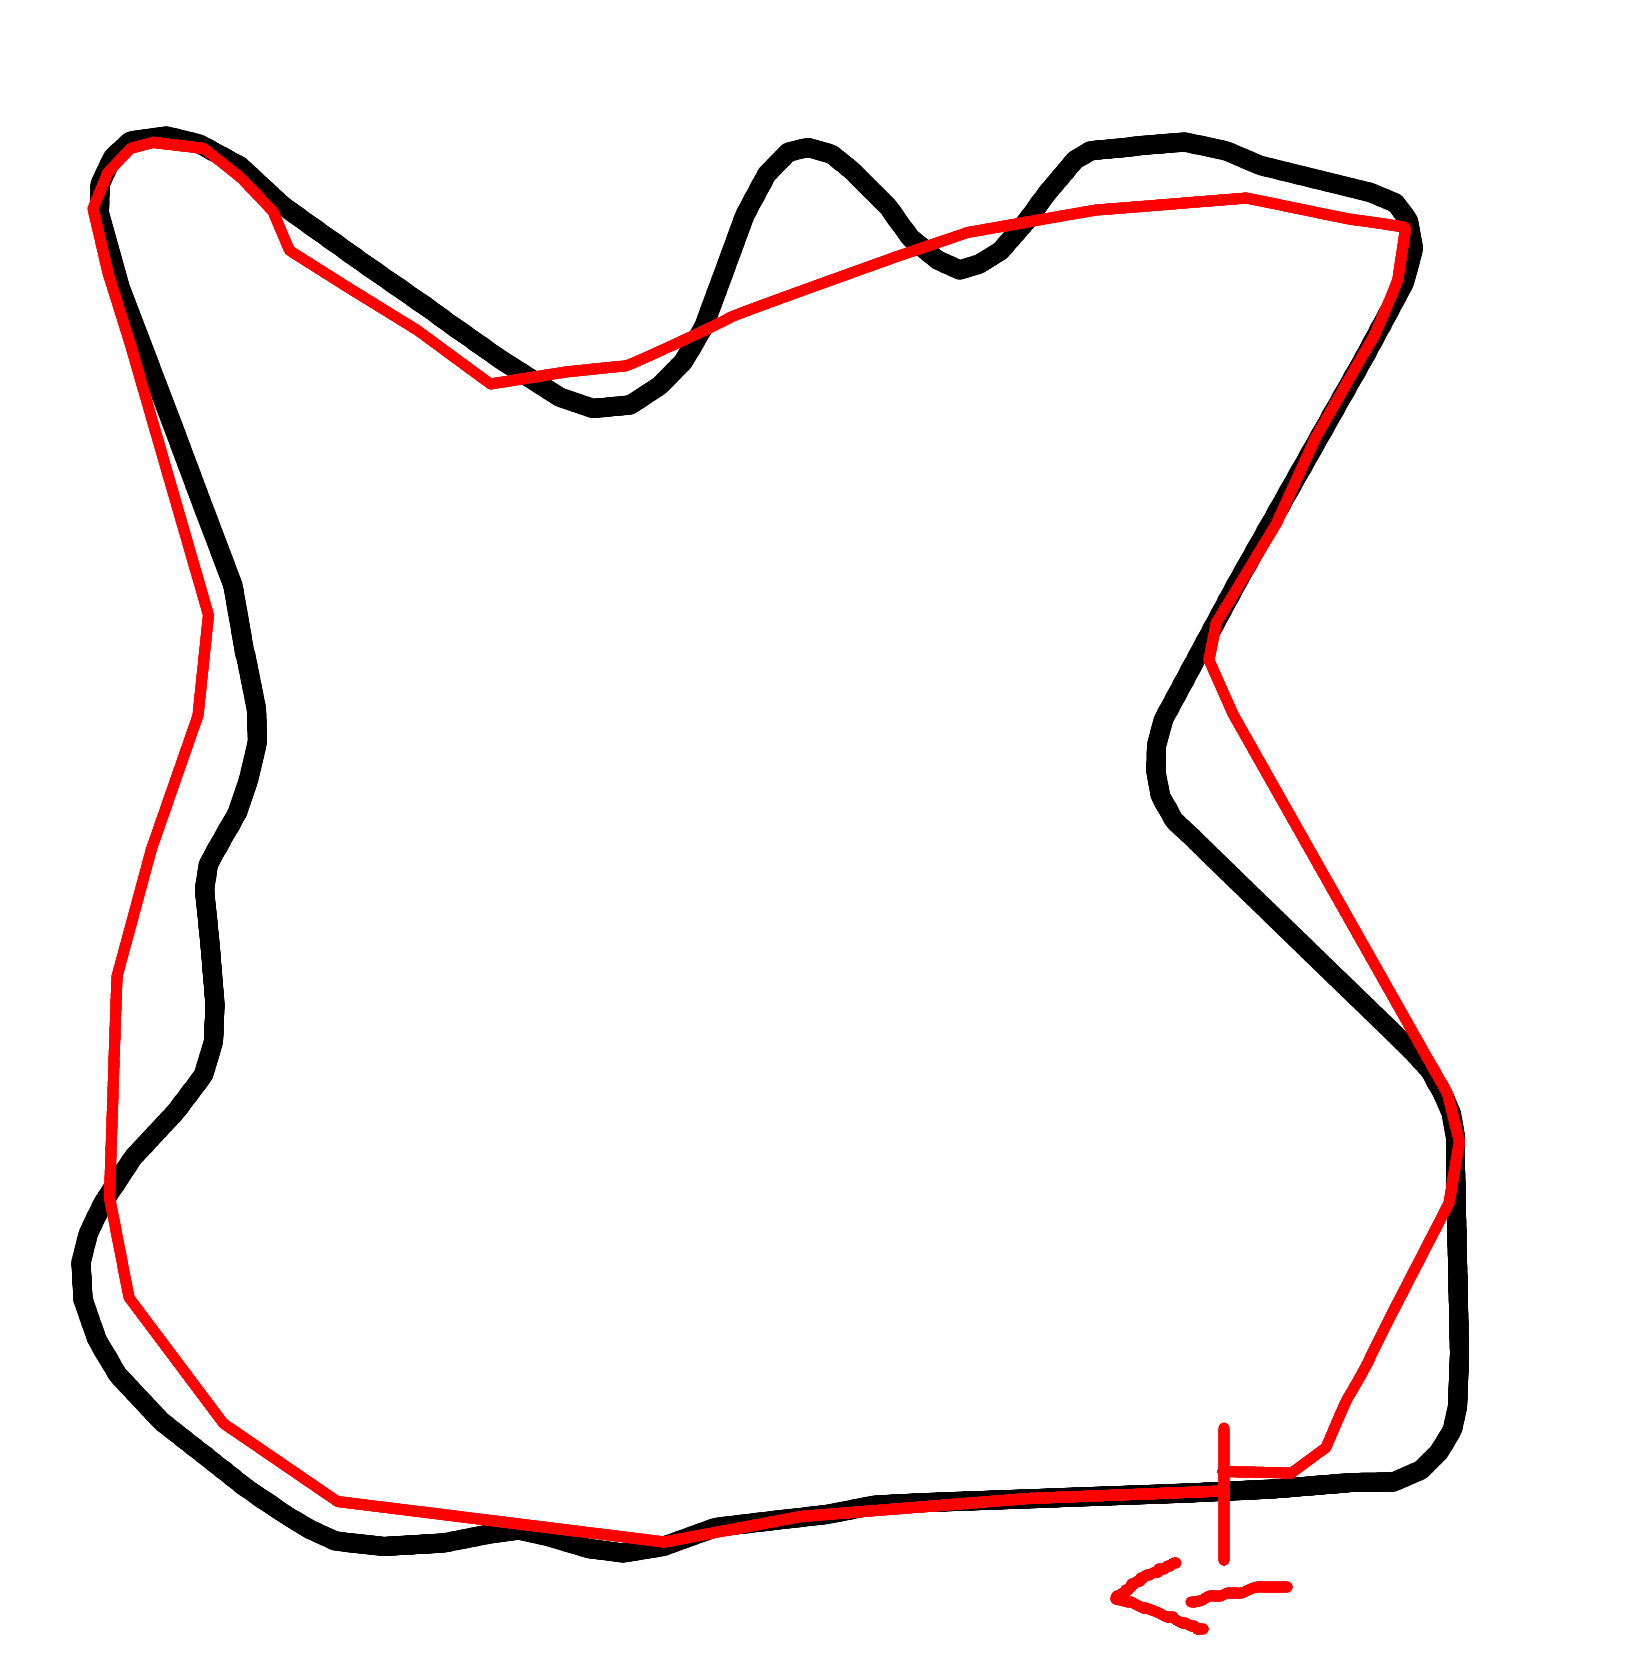
Silver - Scotland - Highland Moors
My best: 251
Truck used: Dynamo
Rough details
- 45 Air
- 23 Drift
- 50 Tree-Runs
- 34 Jump Combos
- 10 Smashes
- 25 Rings
Lap
Smash the opponent on your left and get in the trees on the left. Go to the right of the white trunk, go down, then go between the two tree groups. Continue until the border, but slow down and turn to the right before the white trunk on the border. Get in the water, take the morph, then the pow, jump in the rings and spin. Try to smash an opponent after you land, then drift to the right. Take the morph and jump on the bumps on the right. Don't fly too high, land quickly to jump three times on the right, then once on the left to cut the turn. Take the morph and jump in the rings. If you can, go straightforward and jump on the rock to complete the combo and bounce on the wall otherwise just turn to the right and continue in the water. Don't take the morph that destroy the bridge, jump before on a bump on the right. and jump on the bumps on the track. Lean to the right after the bridge to jump near the trees on the right. Land on the right of the trees on your left. Once you're past the trees continue straight to an opening in the trees in front of you. Then turn to the left to get back to the track between the tree.
Notes
If you're late, don't do the tree-run on the left at the start, instead do a smaller tree-run on the right to cut the turn.
Silver - Fiji - Beach Run
My best: 304
Truck used: Dynamo
Rough details
- 56 Air
- 30 Drift
- 60 Tree-Runs
- 18 Spins
- 33 Jump Combos
- 10 Smashes
- 25 Rings
Lap
Smash the opponent on your left and continue to the left, drift to the right in the grass and start a jump combo by jumping between the palms. On the first island, stay pretty much on the middle of the bump. On the second island stay on the left next to the trees. On the third island, fly near the trees on the right. Stay on the right for the fourth island, but this time don’t follow the track: jump to the right on the slope leading to the right track. Jump on the slope to complete the combo and land on the right track. Go straight to the morph and jump through the rings. Take the pow, go in the palms corridor on the right take the morph but don’t turbo jump on the bump, just fall down near the trees at the angle of the left track going down. Follow the left track and drift to the right while staying close to the palms. Take the morph to do a little jump next to the trees on the right. Continue on the left track, take the morph and jump in the rings. Keep the direction of the rings and cut the turn by jumping over a group of palms. Take the morph and jump on the big hill then drift to the left. Jump, spin and land on the left track. Take the morph and drift in the water. At the end of the water, go up but don’t follow the track, do a big jump over the water, you can easily spin in this jump. Land on the slope between the trees, get back on the track, take the morph and fly in the rings. Finally take the pow and go inside the palm corridor, drift to the right at the end.
Notes
If you hit a palm tree at the end of the last tree-run it’s fine.
Silver - China - Water Way
My best: 214
Truck used: Dynamo / Monster Truck
Rough details
- 30 Air
- 43 Drift
- 17 Tree-Runs
- 10 Spins
- 25 Jump Combos
- 15 Smashes
Lap
Start with the usual truck smash, then lean to the right and start a jump combo between the trees. Take the morph and jump as the land goes down. Land on the track, there is a nice spot with two very small bumps to continue the combo but it’s hard to find. This jump will lead you to the bump before the wall, jump again then jump again upon landing before the turn. Don’t follow the track, go straigh to the hill while staying close to the trees. You will end up in the water way, this is a nice spot to smash opponents. Otherwise, continue straighforward then drift to the right, stay In the water and drift to the left. Take the pow and get in the bamboo corridor. If you hit a tree try to get a truck smash. Get up the hill, take the morph and jump in the rings. If you have the time you can spin in this last jump.
Notes
The jump combo at the beginning is quite hard.
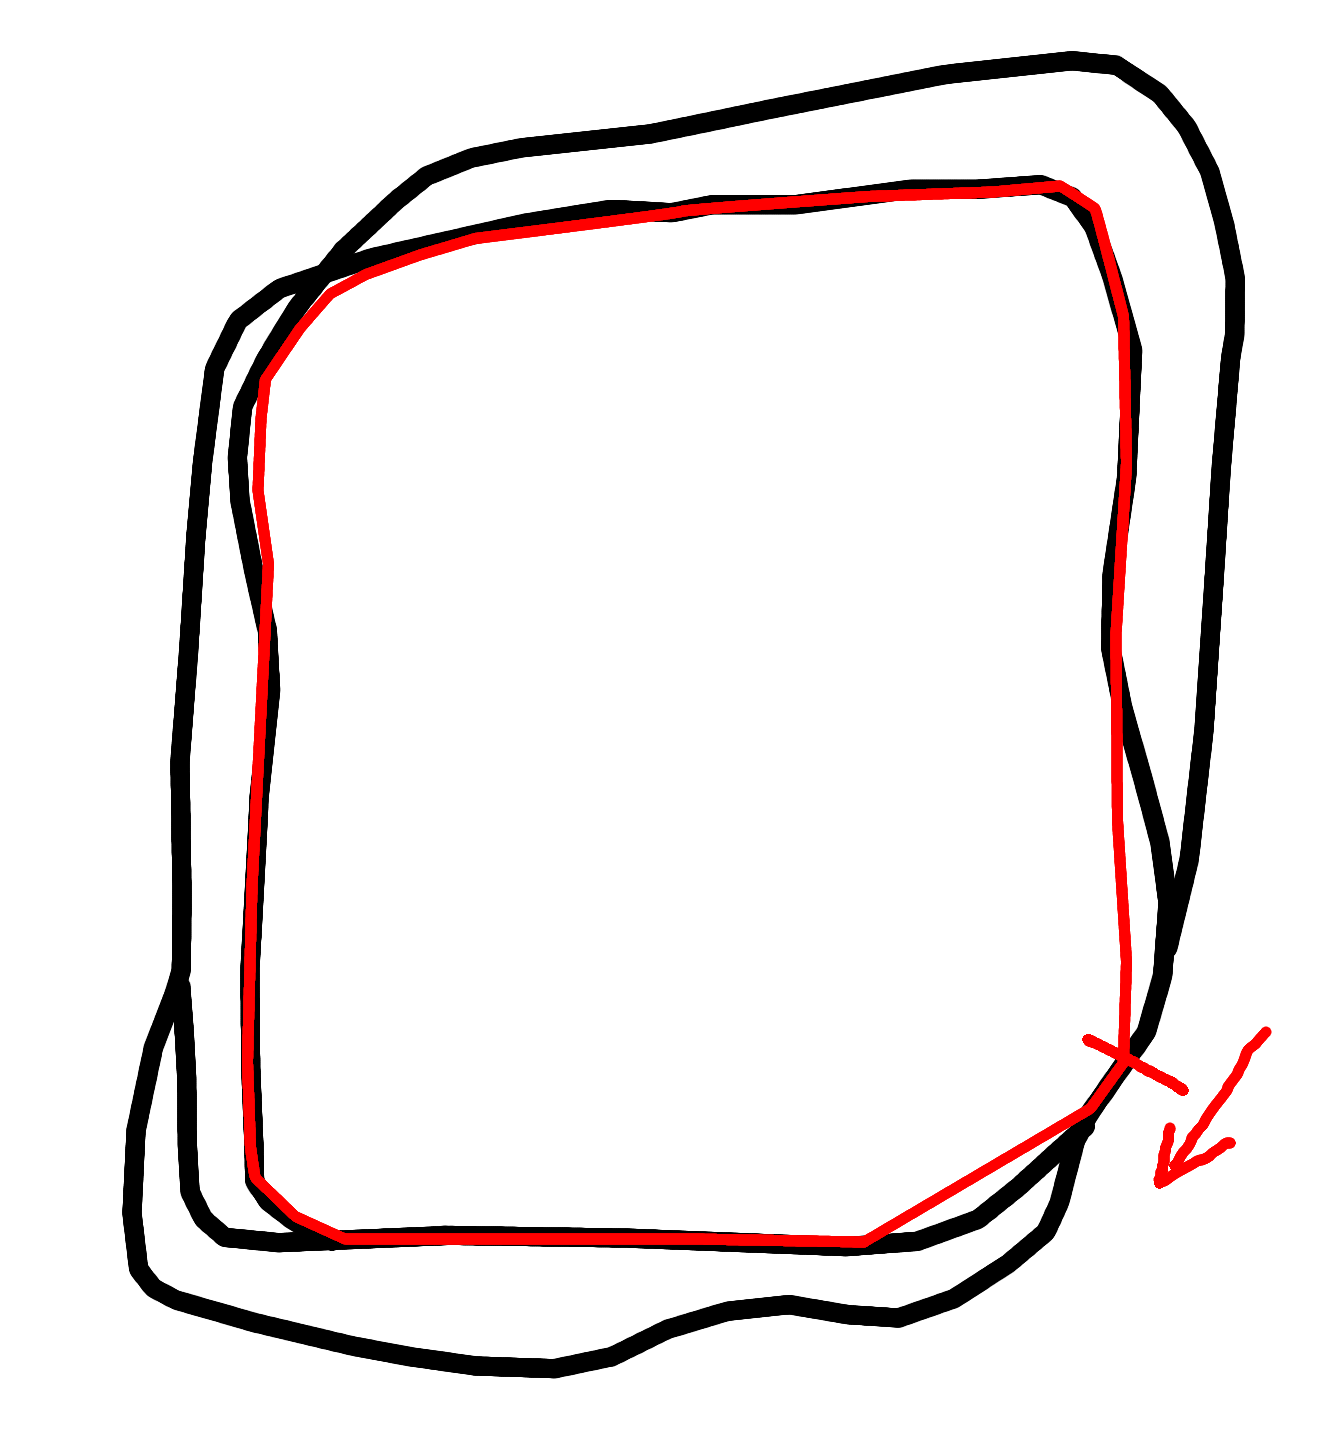
Gold - Canada - River Run
My best: 305
Truck used: Dynamo
Rough details
- 41 Air
- 35 Drift
- 81 Tree-Runs
- 27 Spins
- 15 Smashes
- 22 Rings
Lap
Smash the opponent on your left and continue in the trees to get in the tree corridor. Don’t go too fast, make sure you’re in the middle of the corridor because the slope can lead you in the trees. Jump at the end and spin. While going down try to land between the trees on the right of the track. Go under the bridge and lean to the left near the trees, take the pow and drift to the right next to the tree line on the left. Drift to the left, as the pow makes you very fast you may need to slow down a little not to end up in the wall. Go under the bridge and lean to the left near the trees, just make sure to avoid the rock at the end. Jump in the water, take the morph, continue pretty much straightforward and jump between the trees on the left of the water. Get back on the track, go up and jump in the rings, after taking them spin. Continue on the track, take the morph and go in the tree corridor on the left. Lean on the left of the tree corridor, avoid the tree at the end, but then get back again on the left as there are a few trees after you get in the water. Follow the left track and lean to the right near the trees. Take the morph and jump in the rings. Take the pow and go for the tree corridor. This time the morph will make it easier.
Notes
The rings in the middle are hard to get as the hill doesn’t help you going straight.
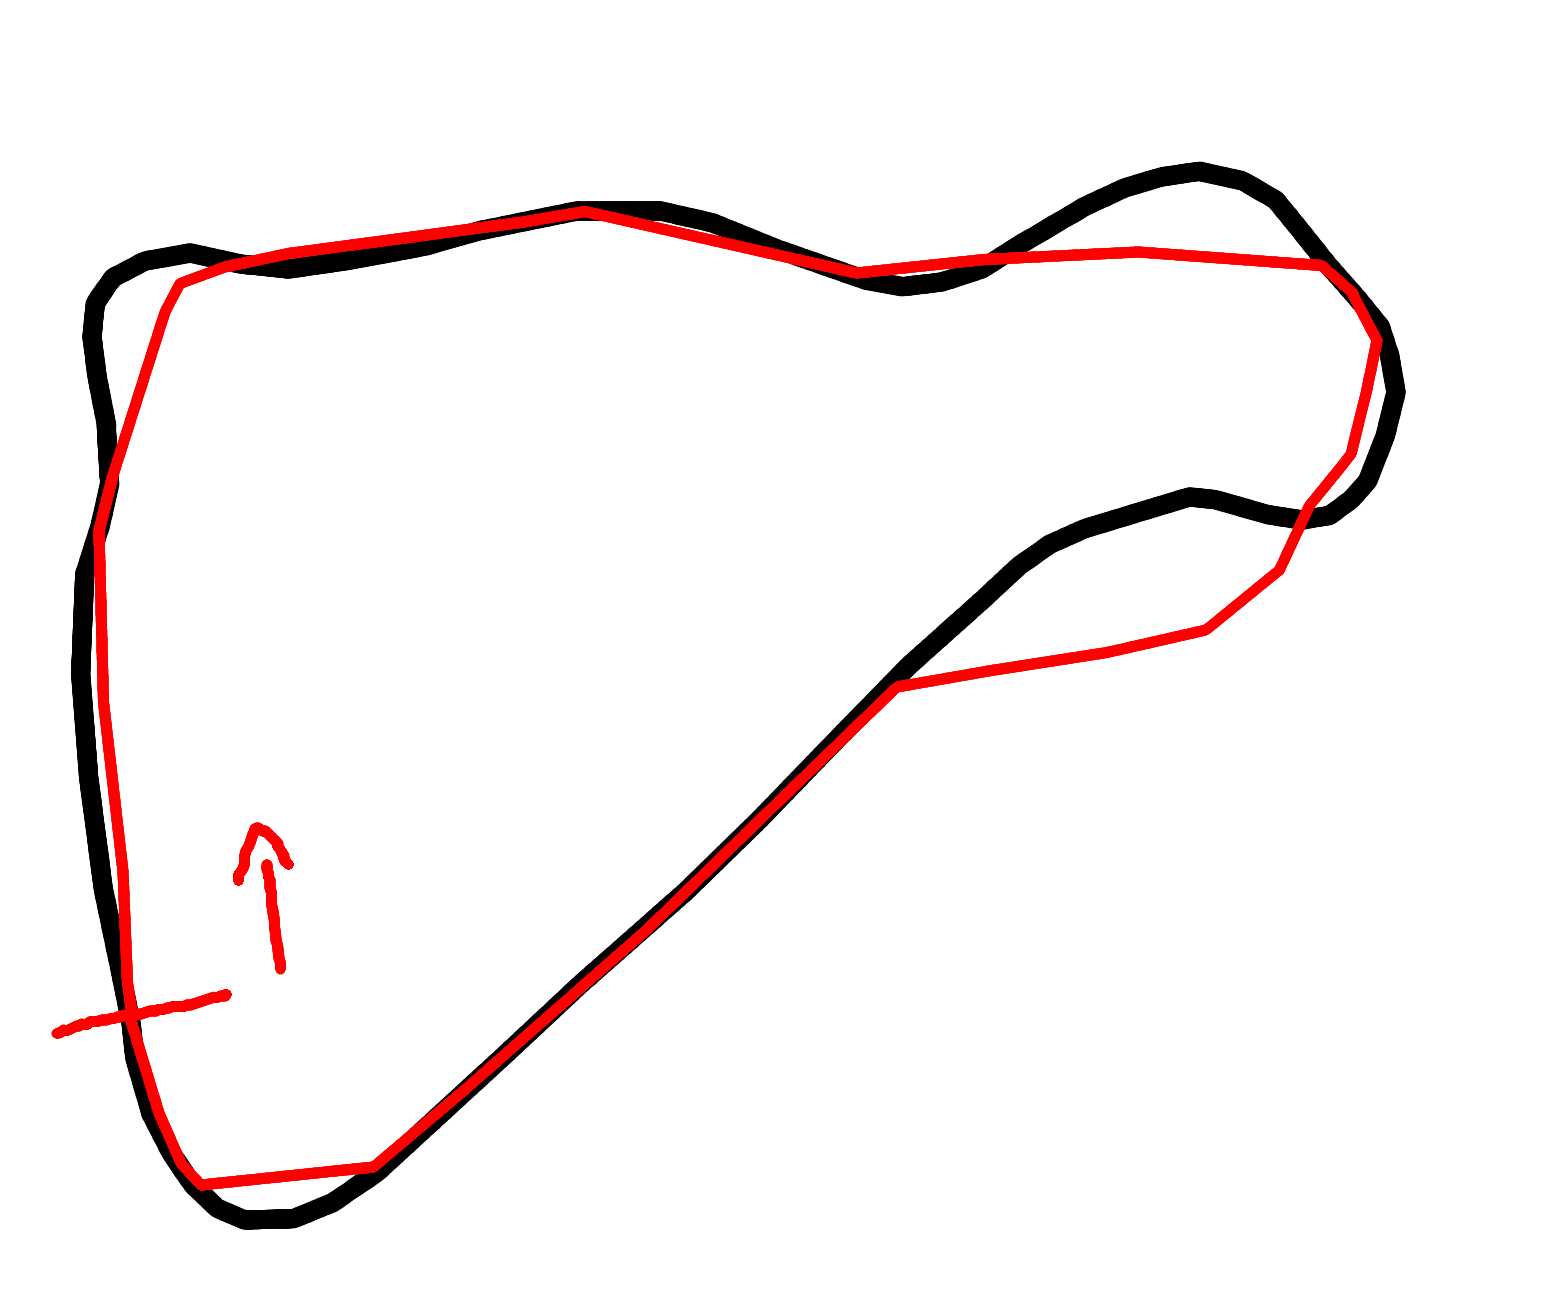
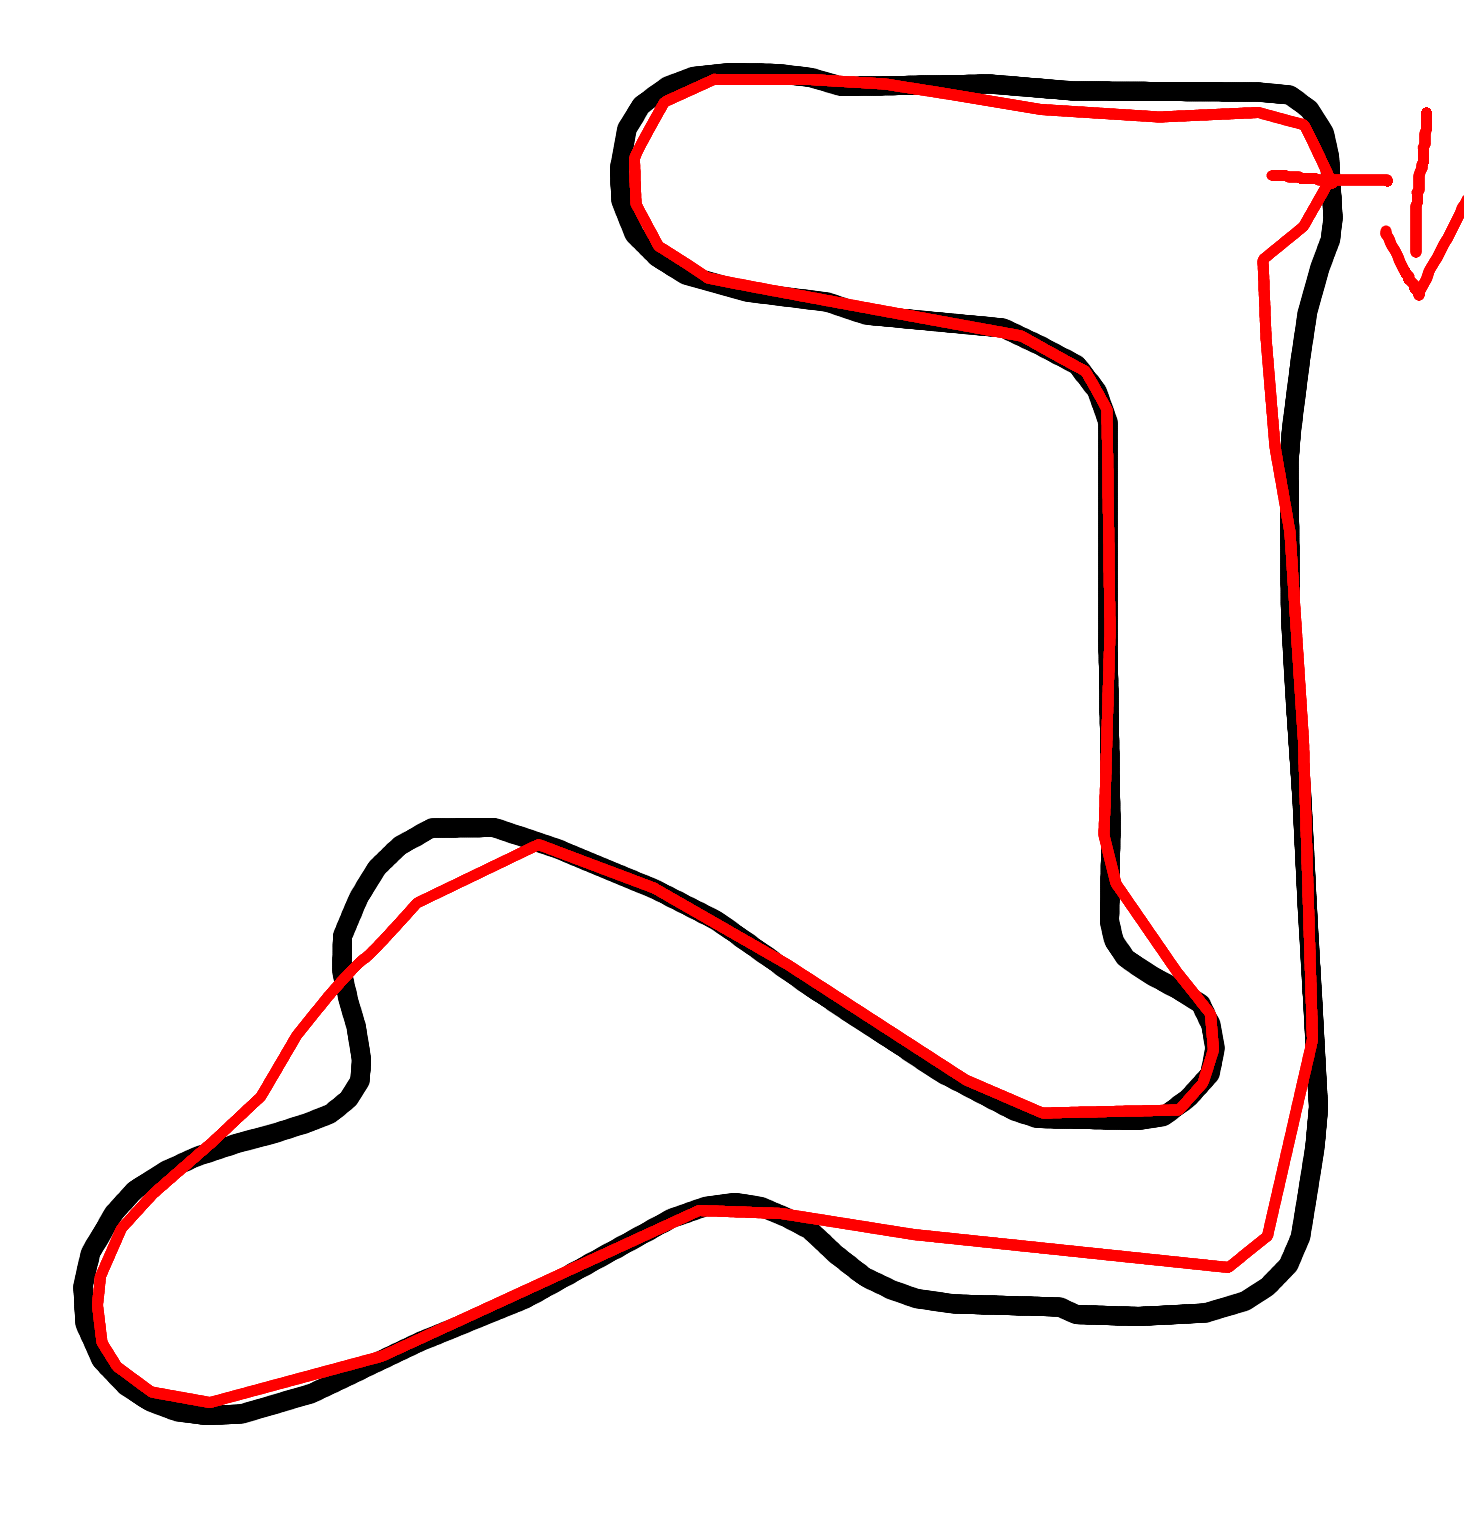
Gold - Finland - Tanker Hop
My best: 205
Claimed online: 223
Truck used: Monster Truck
Rough details
- 47 Air
- 17 Drift
- 16 Tree-Runs
- 23 Spins
- 32 Jump Combos
- 13 Rings
Lap
Smash the opponent on your left then go to the left between the trees, jump and bounce off the wall. Get back on the track, this is a decent spot for another truck smash, then continue on the left track and take the morph. Start a jump combo on a bump at the bottom left of the iceberg before the boat. Jump again at the top of the iceberg and fly over the boat with some spins. Land on the track after the other iceberg. You can continue the jump combo while on the track thanks to two very small bumps. Then land before the bump with some trees before the forest, jump on it at the left if the tall tree and fly over the trees behind, you should end up next to some water near the right track. You may get a last jump on the bump with the trees, then continue until you get to the left track and drift to the right. Take the morph and jump in the rings, then spin. Land on the bump before the water and jump again. Go straightforward, take the morph, jump to the right over the trees and spin. Go up, go under the pipes, turn then jump with the slope on the right. Continue until the big jump, get in the rings.
Notes
Opponents can be quite fast on this one, avoid spining if you need some speed. I have no idea how to use effectively the pow, if you find a path without hitting trees you should probably use it.
Gold - China - Northern Ridge
My best: 218
Truck used: Monster Truck / Dynamo
Rough details
- 41 Air
- 46 Tree-Runs
- 9 Spins
- 54 Jump Combos
- 13 Smashes
Lap
Start with the usual truck smash then lean to the right and jump, land between the trees on the right of the track. Jump again and stay on the right of the track. Jump again on the second bump of the next hill then fall near the trees on the right. Turn to the right to jump again on a bump and fly between the trees. Don't aim for the morph, make a long jump and land after it, just when the track starts to turn to the left. You can jump on a small bump, your jump combo should be preserved. Continue jumping until the hole in the wall and jump again. You should land a little before the next hole, jump on another bump and lean to the left to get in a small ravine. Jump when you get by the trees on the right and fly over the track to land at the end of the forest on the left. You can spin in this jump. If your jump is long enough there is a bump at the end of the forest and another one on the left after the water. Continue until the pow, you may take it, then go on the left of the bridge to avoid the first part of the forest that is too hard. Just stay close to the bamboos and trees on your right. Jump on the bump and land in the water without hitting trees. Then stay close to the groups of bamboos as you continue. At the end of the forest, jump on the hills and spin, then turn right.
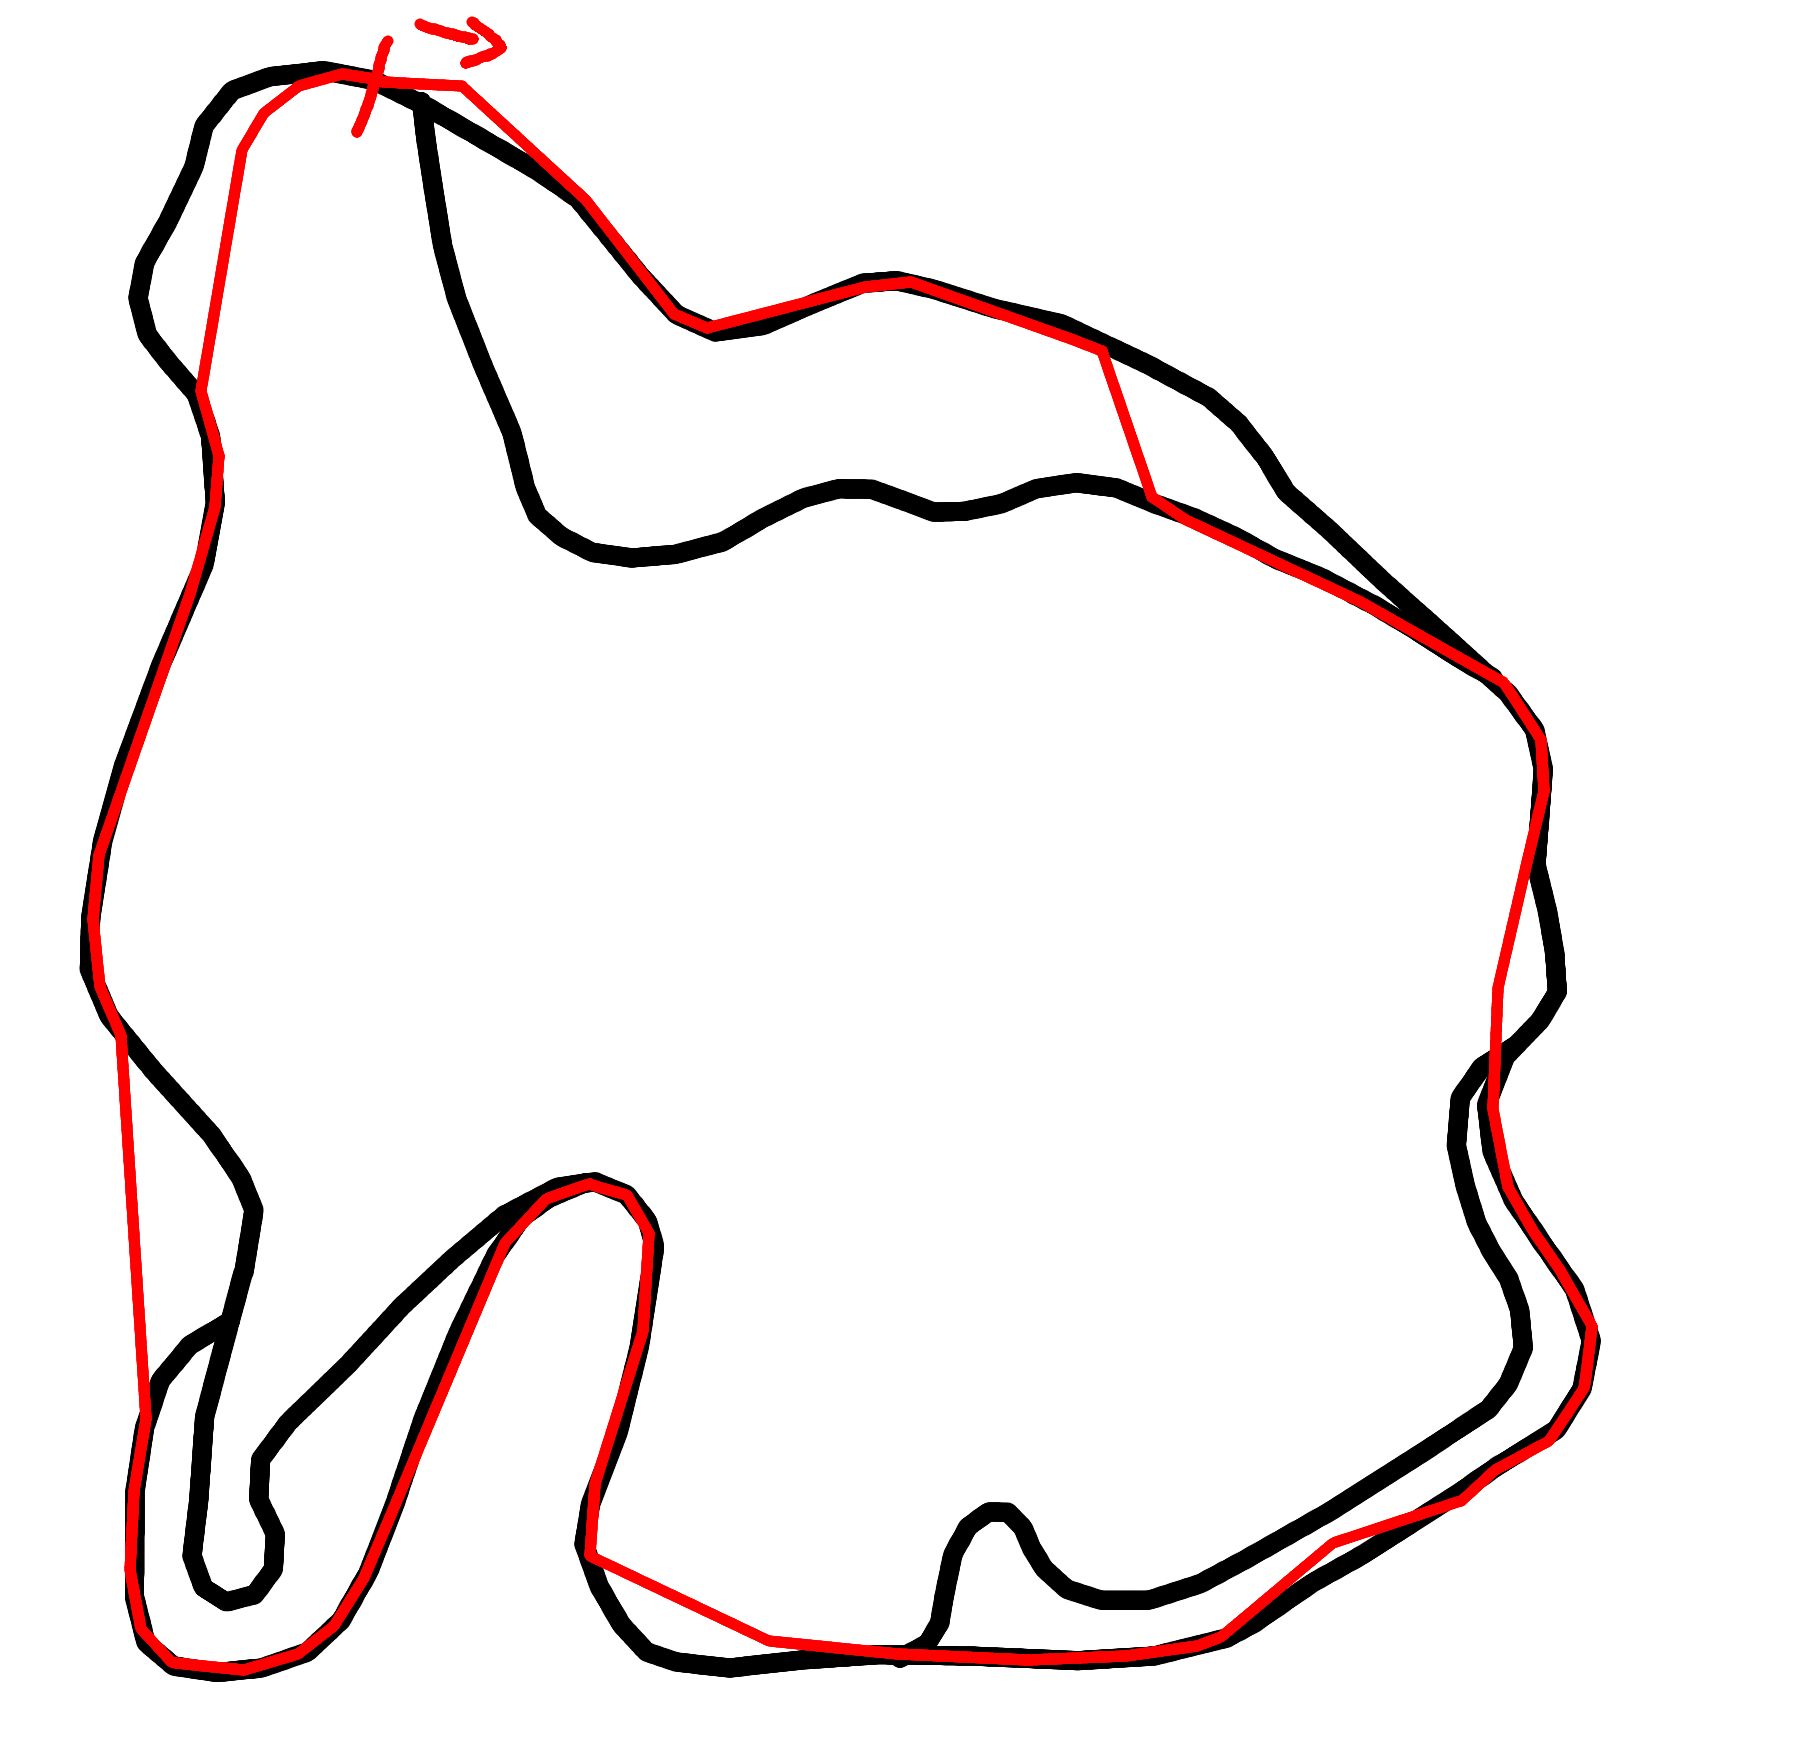
Gold - Scotland - Castle Keep
My best: 317
Truck used: Dynamo
Rough details
- 51 Air
- 15 Drift
- 115 Tree-Runs
- 15 Spins
- 10 Rings
Lap
Smash the opponent on your left then continue inside the forest. Bounce off the invisible wall to get back to the track and jump. Turn to the left, avoid the morph, instead go between the trees on the left. Don’t go too fast and avoid crashing. You will end up following the invisible wall after the right turn. Once you get by the tree inside the wall, go to the right. Continue over the track to the trees on the right and jump on the few bumps. You should arrive near the slope, go to the right inside the tree corridor. Lean to the right at the end of the corridor, take the morph and jump in the rings. Take the morph for the drawbridge, jump and spin. Take the pow but avoid flying over the trees on the right, this corridor isn’t open in this race. Instead lean on the right of the track to get by the trees.
Notes
You may take the morph at the beginning to get rings and spins. If you do that, get in the trees on the left after the turn to the right.
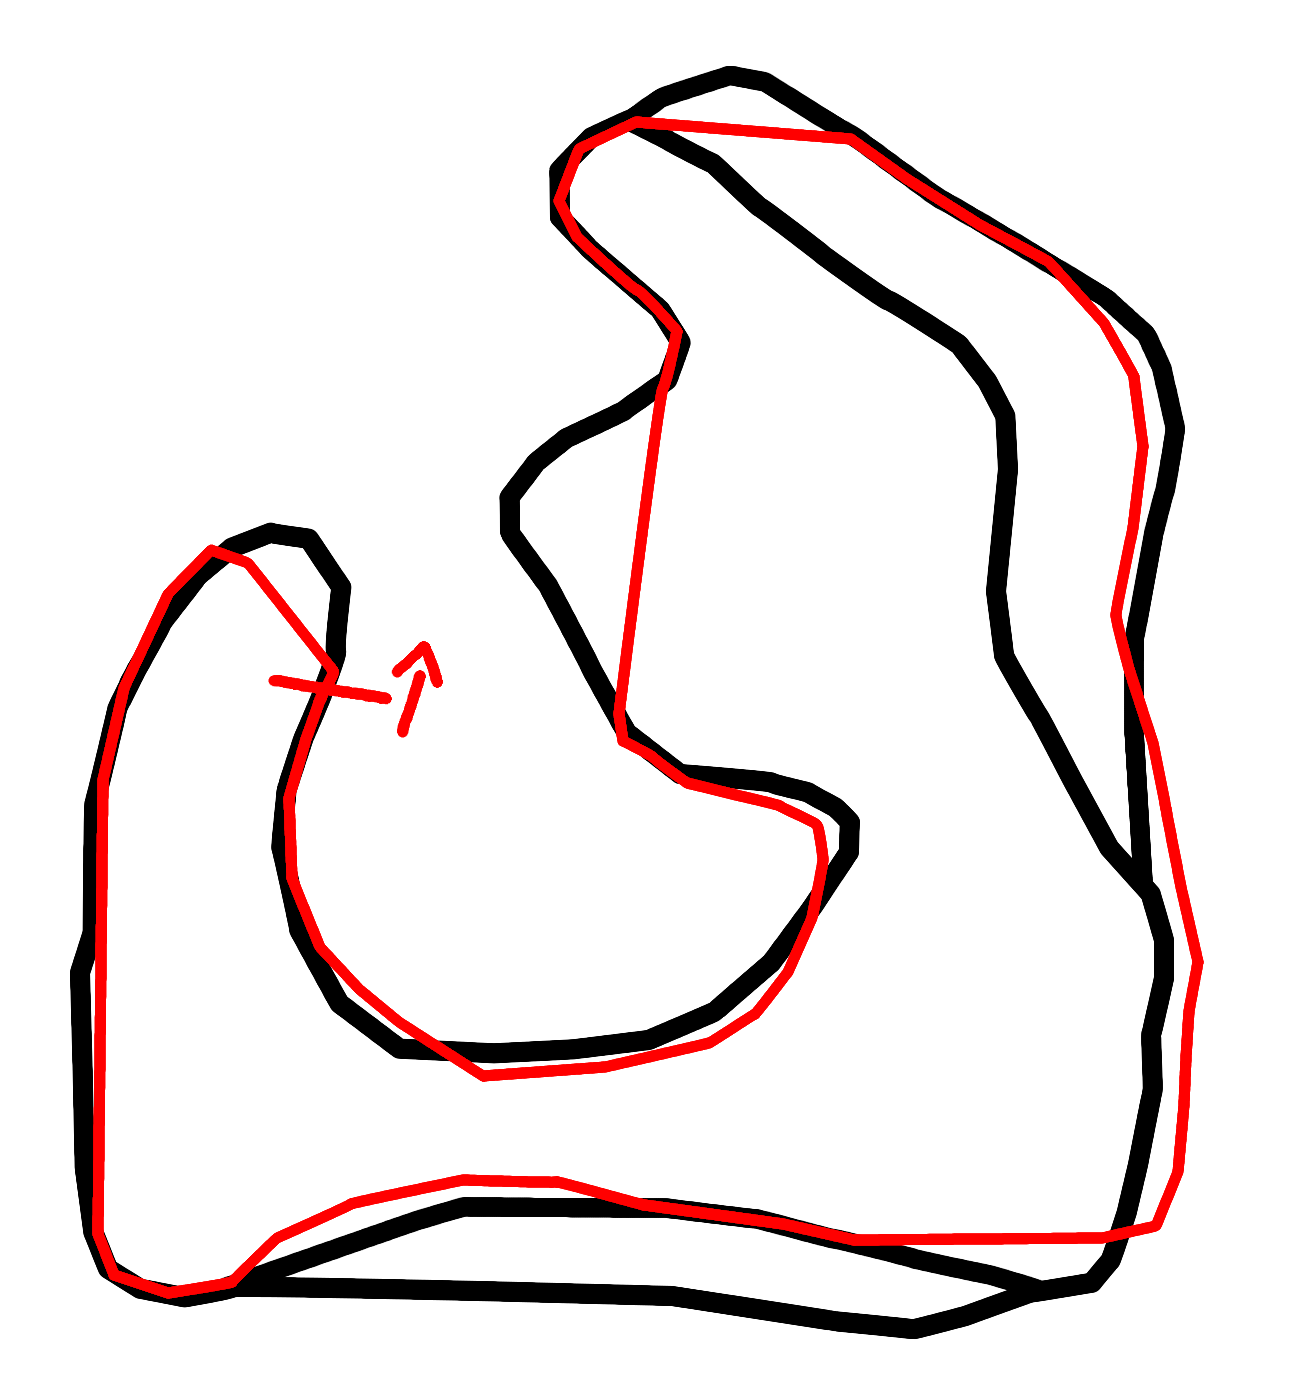
Gold - Fiji - Mountain Run
My best: 251
Truck used: Dynamo
Rough details
- 30 Air
- 35 Drift
- 86 Tree-Runs
- 10 Spins
- 20 Smashes
- 17 Rings
Lap
Start with a truck smash on your left opponent, then get behind the palms on the left. Drift to the left, you may need to slow down. Follow the left track, take the morph and drift to the right. Take the next morph, jump and spin. Land on the right track, take the morph and jump in the rings. Upon landing drift to the left, go for the next morph and jump. Fly to the left over the palms and land in the middle of the tree corridor. Follow the track for the turn, then avoid the morph and get in the trees on the left to cut the next turn. Take the morph and jump to the right, in the rings. Take the pow and focus on not hitting a palm. When the track on the left starts rising, use the slope to jump. Fly over the left track and cut the turn. Take the morph for the tree corridor and take it. At the end avoid the last palm by going to its left.
Notes
You can go to the left and stay on the ground after the first rings to get the full tree corridor.
Platinum - Finland - Ski Jump Loop
My best: 190
Truck used: Monster Truck / Dynamo
Rough details
- 46 Air
- 17 Tree-Runs
- 19 Spins
- 42 Jump Combos
- 5 Rings
Lap
Smash the opponent on your left, then go on the right of the right track and cut the turn by jumping behind the trees. Take the morph, go up and jump in the rings, then spin. Follow the right track, take the morph, jump and spin. Land near the trees on the right and get between them after the tree separated from the others, there is a small corridor that isn't too hard. Continue on the right track and jump on the bump before the water. Land before the island, jump on its bump, do the same with the next one. Turn to the right while flying and try to jump on the second bump of this island. You should land near the beginning of the next island, continue jumping. Finish the jump combo on its final bump. After the water, go to the right and go back on the track through the trees.
Notes
If you find a safe path for the pow, go for it. Instead of taking the right track after the big jump, you can take the left path to get the other pow and some rings. Just jump back to the right track after the arch. The jump combo tends to break after the arch though.
Platinum - Scotland - Baron's Run
My best: 303
Truck used: Dynamo / Monster Truck
Rough details
- 56 Air
- 16 Drift
- 69 Tree-Runs
- 47 Jump Combos
- 10 Rings
Lap
Smash your opponent then take the morph and jump in the rings. Land before the next morph, take it and jump again. Land before another bump, jump and try to jump again on the rock before the right turn. Don't follow the track and go in the tree corridor on the left. At the end of the tree corridor jump on the big bumps then land and drift to the right. Take the morph and go on the bumps on the right to start a jump combo. Jump two or three times on the right, then once on the left bumps, then jump between the trees on the bump after the left turn. Land at the end of the water and jump again. Land in the puddle, jump once more. Land on the right of the track, you can jump twice to get over the hill. Try to stay on the right of the track and not fly over the trees. Jump once more on the bumps and turn right. Jump again and try to fly over the middle bump as it can slow you down a lot. Continue until the drawbridge, take the morph, jump in the rings and spin. Go to the right to take the tree corridor, lean to the right at its end to continue a little between the trees.
Notes
You can take the pow instead of the drawbridge if you want.
Platinum - Mexico - Devil's Ladder
My best: 301
Truck used: Dynamo
Rough details
- 65 Air
- 24 Drift
- 55 Tree-Runs
- 29 Spins
- 45 Jump Combos
- 17 Smashes
- 13 Rings
Lap
Truck smash your left opponent then go to the right near the group of three trees. Jump a little to the left and land close to another group of trees. Continue straightforward, take the morph, go up and jump in the rings. Land on the right to cut the turn between the trees. Jump and land on the right of the track near the trees. Jump on a bump to get back to the track, make sure to start a jump combo. Land on the morph and jump twice to continue the combo. Spin while falling down, land before a bump and jump again. Drift to the right near the trees and take the pow. Get back on the track and go for the tree corridor going up, there is a small bump in the corridor, jump on it. Go through the track and cut the right turn by going in the trees. In this forest there is a another bump, continue the jump combo. Land after the morph, but don’t take it, jump on the bump. Land before the first bump of the group, jump again. Land before the last of the group and jump. Land at the end of the platform between the two ravines, jump again, then drift to the left. Aim for the forest, jump on the bump and fly over the trees. Make sure to take the morph, then jump in the rings. Turn to the left, take the morph, jump and spin. Land and drift to the right, avoid the morph. Take the next morph and jump between the trees on the right of the track. Finally drift to the right.
Notes
Make sure you’re well positioned before going in the tree corridor. You don’t want to turn while in the slope.
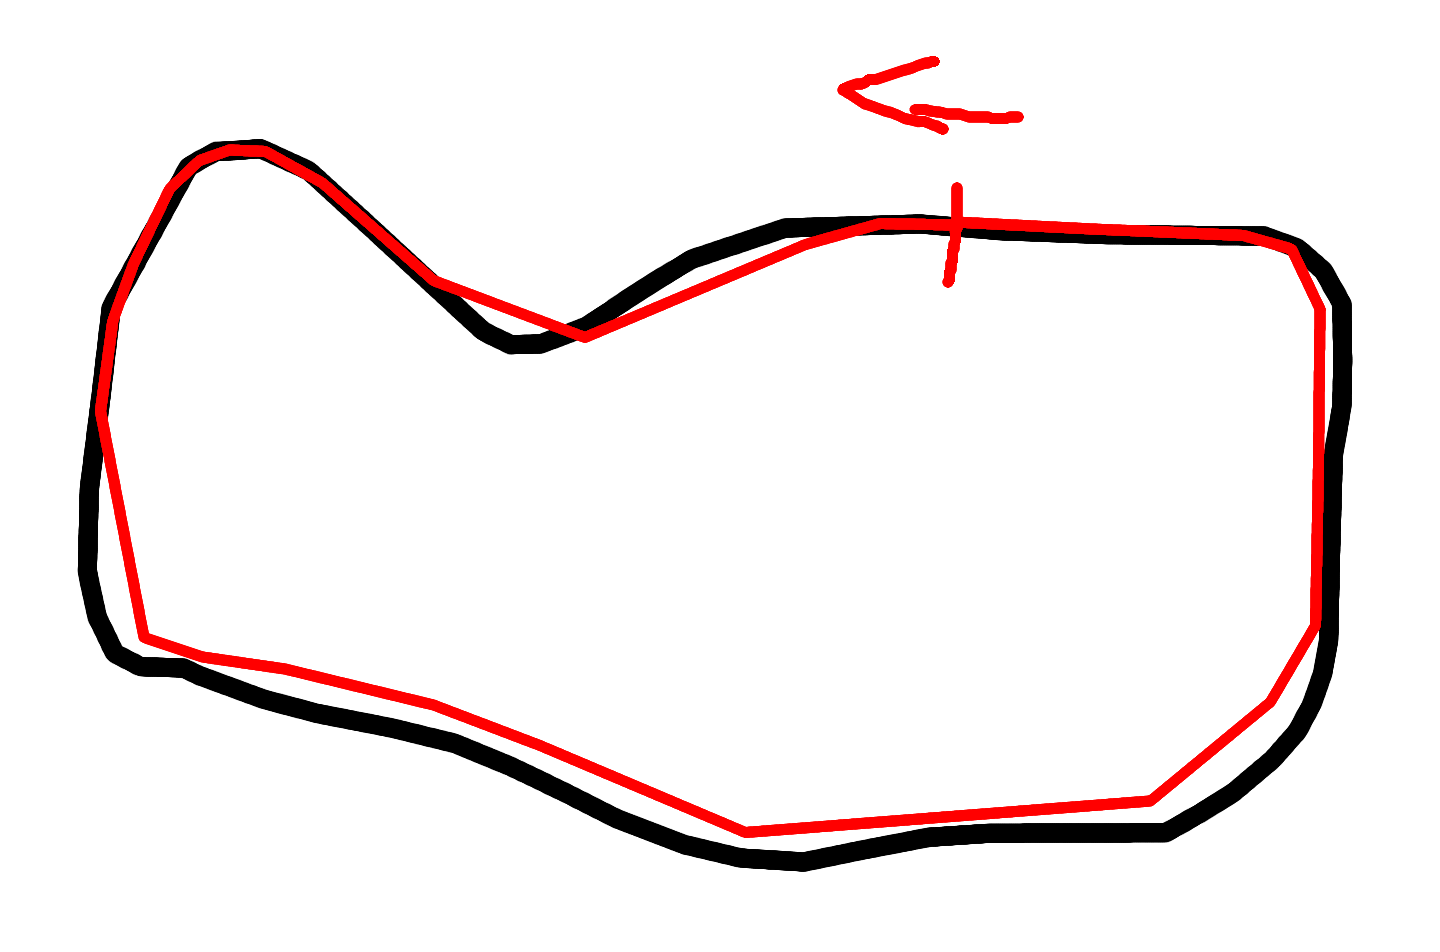
Platinum - China - Southern Loop
My best: 261
Truck used: Dynamo
Rough details
- 54 Air
- 20 Drift
- 31 Tree-Runs
- 24 Spins
- 21 Smashes
- 12 Rings
Lap
Try smashing your opponent if you can, then take the morph to get a good truck throw, jump and spin twice. Take the next morph, jump and spin again. Take the morph and drift to the left. Take the morph to jump in the rings, then spin and fall on the track. Don’t take the tree corridor unless you can do it well. Instead just lean to the right of the track to get some tree-runs. Turn to the left, take the morph and go to the right for the tree corridor. Opponents may be near you when you exit it, try smashing them. Lean to the left during the next jumps to fly a little near the trees. Cut the last turn by jumping between the trees.
Notes
Getting right the tree-runs involves quite some luck and practice.
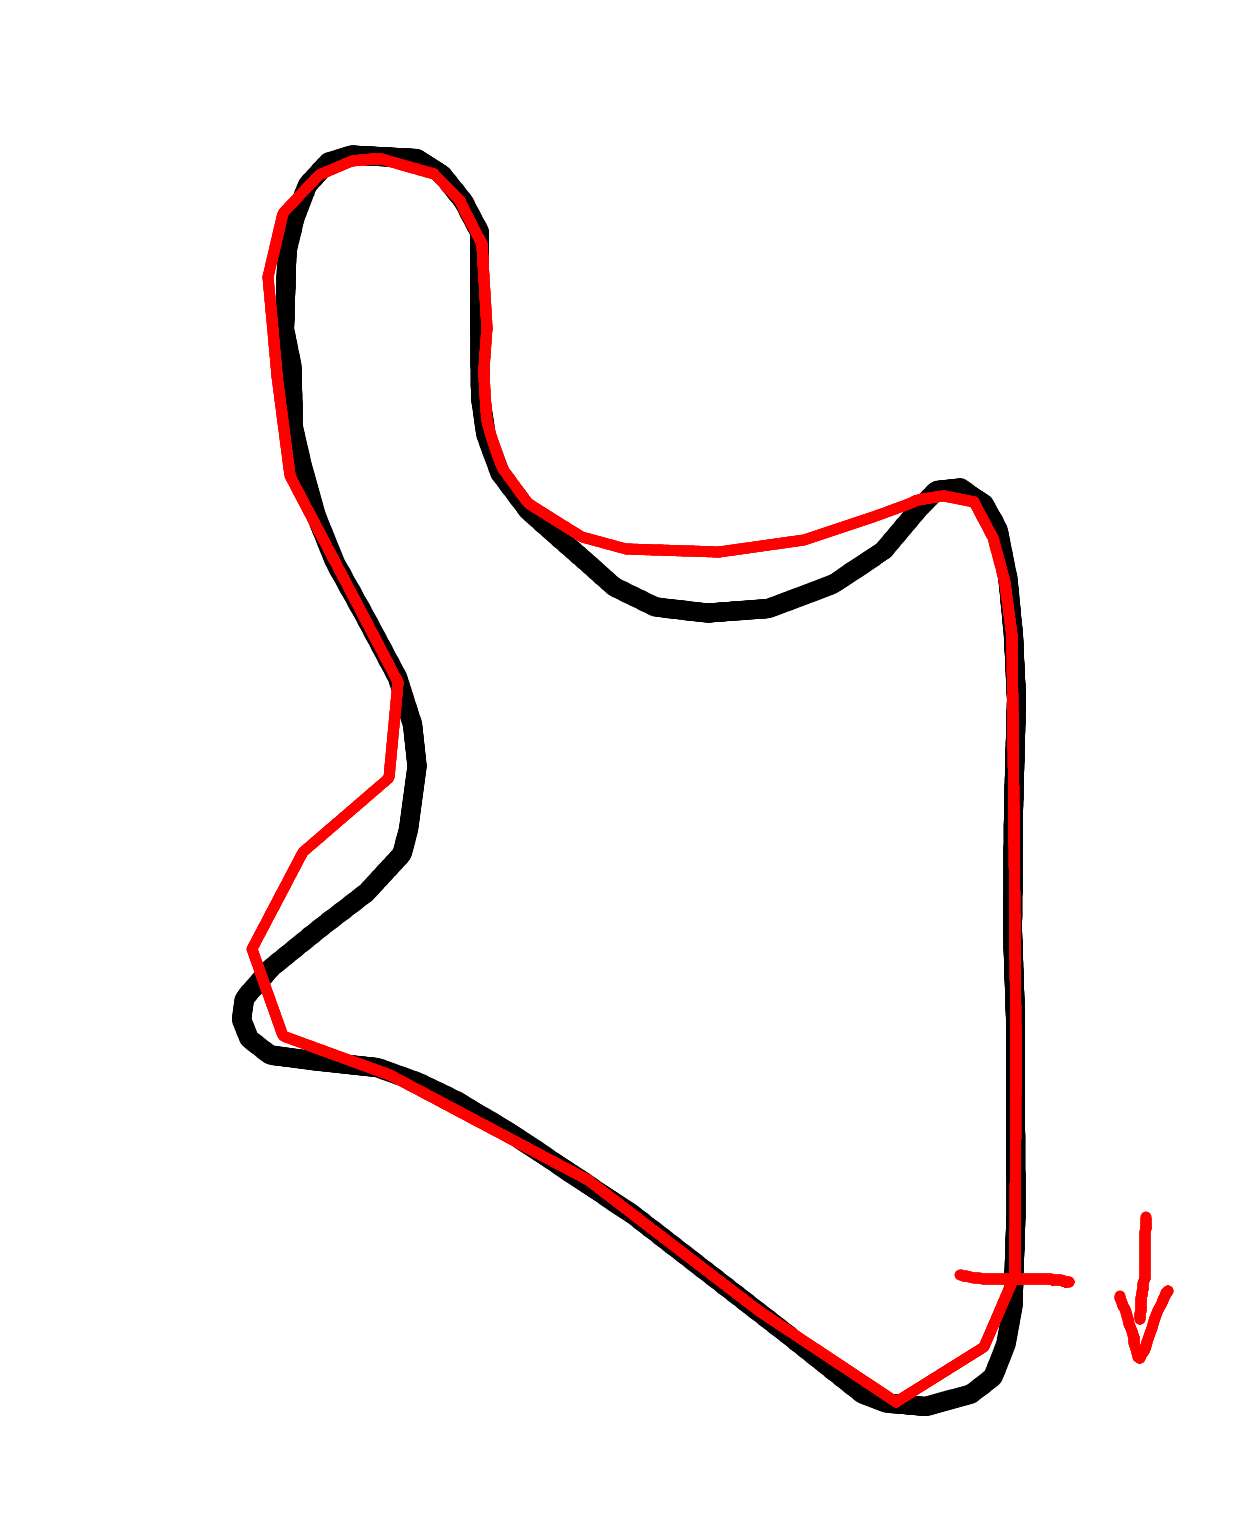
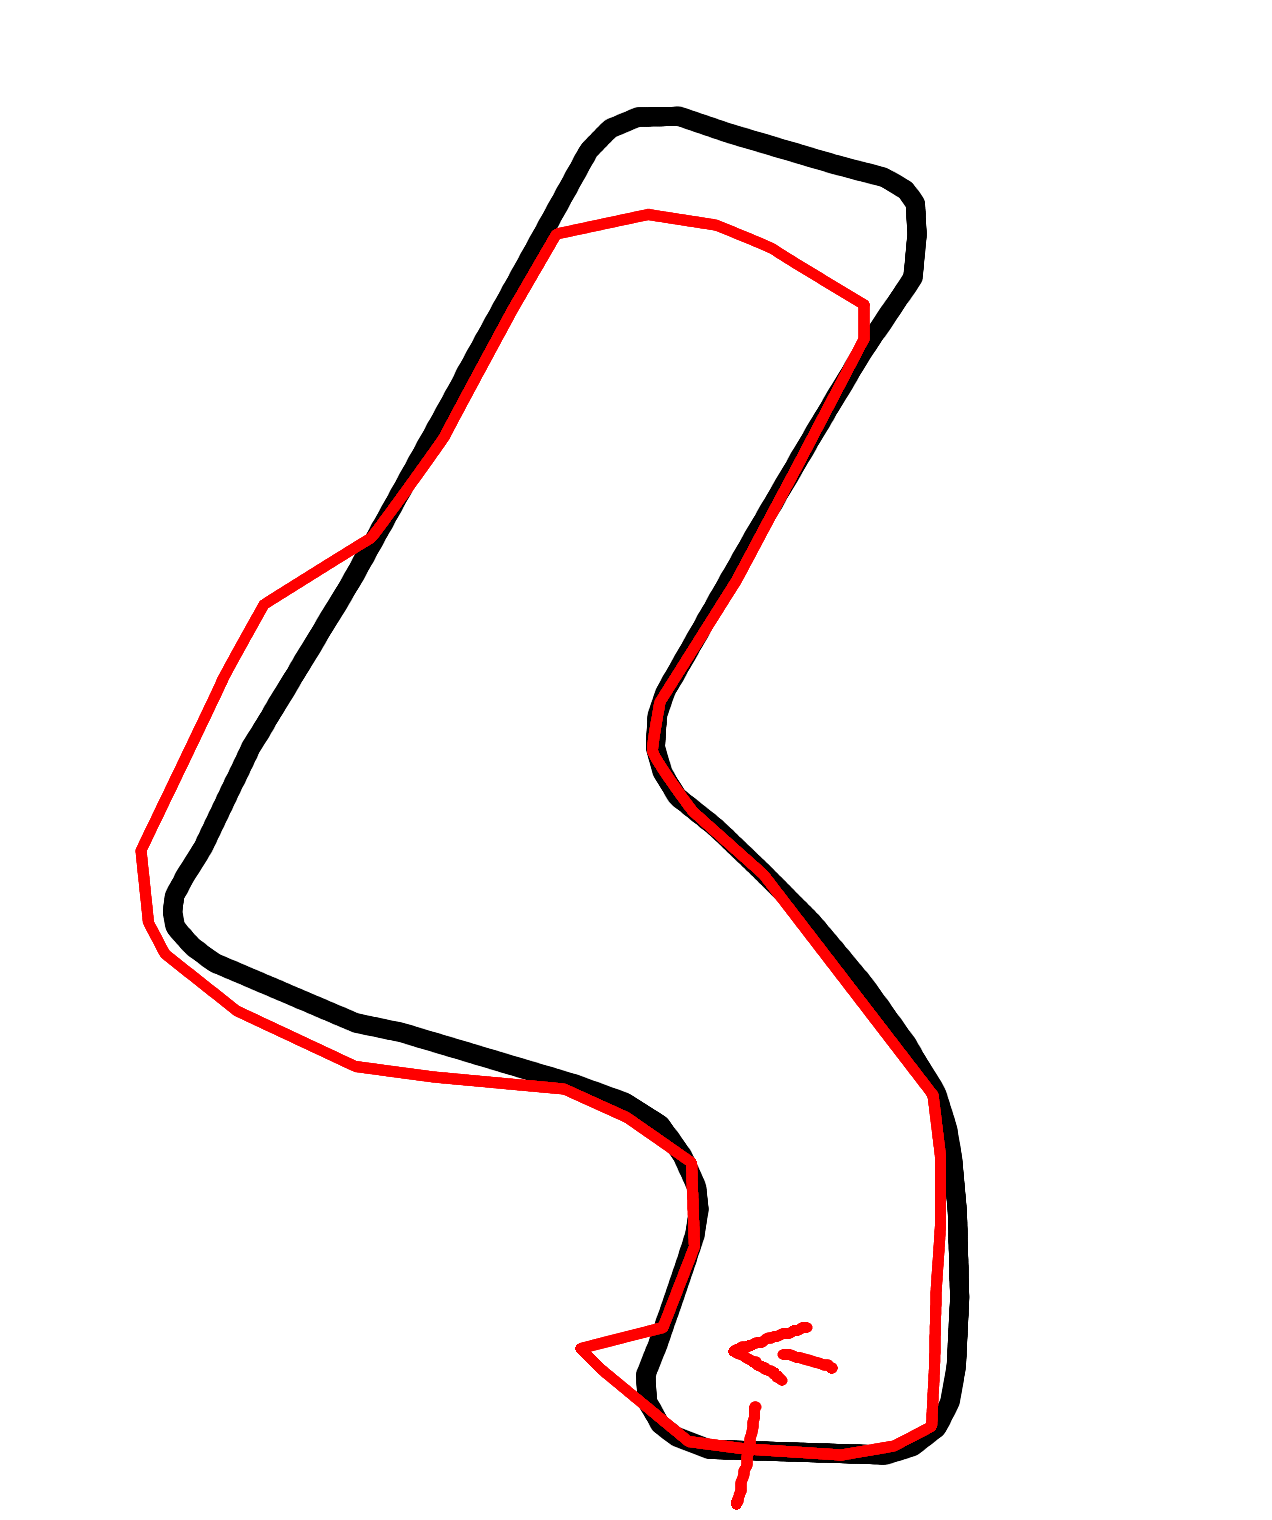
Platinum - Canada - Winding-Road
My best: 579
Claimed online: 622
Truck used: Dynamo
Rough details
- 65 Air
- 75 Drift
- 298 Tree-Runs
- 19 Smashes
Lap
Start with the usual smash, then lean to the left to get near the trees. Take the morph, lean to the right, jump and land on the right behind the trees on the hill. Slowly lean to the left to get back to the track. When going down, go behind the three trees on the right. Go under the bridge and lean to the left, next to the trees. Drift to the right while staying close to the trees, then drift to the left. Lean to the left after the bridge but then follow the track on the right. While going up, get close to the trees on the right. Take the small bump on the right of a little tree, cross the track and go behind the trees on the left of the track. Slow down to turn left, take the morph, go up, jump on the right of the tree at the top. Land behind the trees, continue straightforward, get back to the track when it turns. Take the morph and lean to the right, continue until the water. Once in the water, take the morph to lower the track, go behind the trees on the right. Get back on the track after its turn, turn further to the left and take the tree corridor. At its end, lean to the right to stay close to the trees. Jump and fly over the trees to cut the turn. Land but don’t take the pow, go for the tree corridor at regular speed. Slow down a little at the top of the hill in the forest not to do a big jump. At the end of the corridor, follow the track and get close to the trees in the next turns. Once you’re in the water, take the morph, go up and jump. Land, continue and when the track splits, follow neither, go on the left of the right track, between the trees. You should be able to jump and land near the end of the left track. Take the morph, go up, jump and land quickly before the pow to take the tree corridor. Make sure to follow the corridor as it goes a little on the left. Once you’re back on the track, turn right and jump on the bumps. Stay a little on the left of the track as you jump. After the bumps, lean to the left near the trees and drift to the right. You should get close to the tree inside the turn, then continue drifting until the trees on the left of the track.
Notes
You can probably get a bunch more stars by spinning a lot. Just make sure you get the tree-runs right as this is what will get you most of the stars.
Diamond - Nebula - Crystal Road
My best: 317
Truck used: Dynamo
Rough details
- 49 Air
- 37 Drift
- 111 Tree-Runs
- 13 Jump Combos
- 22 Smashes
- 19 Rings
Lap
Smash the opponent on your left, then lean to the right, cut the turn and try smashing another truck. Take the left track and lean on its left. While going up, get behind the trees. Continue until the hill and jump back to the track. Avoid the morph, take the pow and go in the tree corridor. After getting back on the track, drift to the right, take the morph and jump in the rings. Continue in the canyon and drift to the left. This is a nice spot to get another smash if you can. Take the next morph and lean to the right once in the water. Turn to the left at the end of the water to enter the second tree corridor. At its ends, follow the right track and drift to the right. After the track crossing, continue straightforward, jump, take the morph and jump in the rings. Land a little on the right at try to continue the jump combo on the bumps. At the end of the lap, just go straight.
Notes
Make sure to be in the good direction when getting in the tree corridors. Both are after some turns, you don’t want to enter them while drifting. Feel free to slow down before them.